Red Laser Engraver: verschil tussen versies
| (12 tussenliggende versies door 3 gebruikers niet weergegeven) | |||
| Regel 1: | Regel 1: | ||
| − | {{NoiseCat3}} {{SafetyCat3 | + | {{NoiseCat3}} |
| − | [[Categorie:Tool]] | + | {{SafetyCat3}} |
| − | [[Categorie:CNC]] | + | [[Categorie:Tool]][[Categorie:CNC]] |
| − | |||
| − | < | + | <tabs> |
| + | <tab Name="Discontinued"> | ||
| − | + | '''This Machine has been discontinued in March 2024.''' | |
| − | + | It now lives in storage op het zoldertje. | |
| − | + | No picture available. | |
| + | |||
| + | </tab> | ||
| + | <tab Name="Old Info"> | ||
| + | |||
| + | =Red Laser Cutter / Engraver= | ||
| + | <span style="color: rgb(255, 0, 0);" data-mce-style="color: #ff0000;"><big>This machine is out of order !</big></span> | ||
| + | |||
| + | It is currently being rebuild by Dirk-Willem (started 2020-1) | ||
| + | |||
| + | =Rebuild_= | ||
The red laser is being rebuild - with a 450 nm laser. | The red laser is being rebuild - with a 450 nm laser. | ||
Files are kept at [[https://github.com/MakerSpaceLeiden/RedLaserRedux github]]. | Files are kept at [[https://github.com/MakerSpaceLeiden/RedLaserRedux github]]. | ||
| − | = Safety = | + | =Safety= |
| + | Er is een speciale rode [[Laser safety googles (2020-1)|Laser safety google]]; en de HV voeding zit er nog wel in - maar zou in theorie niet aan moeten gaan. Het water circuit is schoon/droog geblazen. | ||
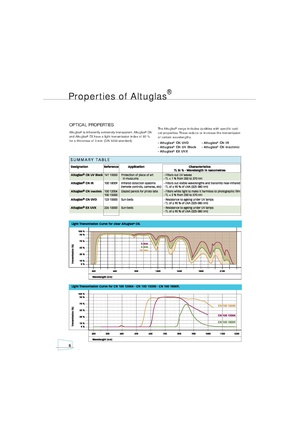
| − | + | =Raam= | |
| + | Gebruikt is 2 lagen CN100-15000 - met lage transmissies voor golflengtes onder de 500nm. | ||
| − | |||
| − | |||
[[Bestand:Altuglas.pdf|page=6|300px|Acrylaat details zagen]] | [[Bestand:Altuglas.pdf|page=6|300px|Acrylaat details zagen]] | ||
| − | = Build info = | + | =Build info= |
| − | |||
[[Bestand:temp-laser-table.png|miniatuur|Voltage / temperature mapping]] | [[Bestand:temp-laser-table.png|miniatuur|Voltage / temperature mapping]] | ||
| Regel 39: | Regel 48: | ||
Todo: | Todo: | ||
| − | # < | + | # <s>check that this patch is applied: https://redmine.laoslaser.org/issues/68</s> |
| − | # < | + | # <s>check clearance near front on top of laser</s> |
# check various bolts - most seem to miss their washers. | # check various bolts - most seem to miss their washers. | ||
# Rework interlock design (overtemp, lid) | # Rework interlock design (overtemp, lid) | ||
| − | = Bridge printje = | + | =Bridge printje= |
Should: | Should: | ||
| Regel 55: | Regel 64: | ||
# Leave all else to the PWM control | # Leave all else to the PWM control | ||
| − | == V1.00 version == | + | ==V1.00 version== |
| − | |||
[[Bestand:Schema-red-laser-bridgeredux.svg|600px|schematic bridge board]] | [[Bestand:Schema-red-laser-bridgeredux.svg|600px|schematic bridge board]] | ||
Actual values may differ to schematic - depending as to what was on the table/scraps-jar. | Actual values may differ to schematic - depending as to what was on the table/scraps-jar. | ||
| − | == V1.01 == | + | ==V1.01== |
| − | |||
[[Bestand:Schema-red-laser-bridgeredux-1.01.svg|600px|schematic bridge board]] | [[Bestand:Schema-red-laser-bridgeredux-1.01.svg|600px|schematic bridge board]] | ||
| − | |||
# The second opamp in the [[https://en.wikipedia.org/wiki/LM358 LM385]] was used as a [[http://www.learningaboutelectronics.com/Articles/Voltage-follower voltage follower]] to decouple the thermosensor and not have the hysteresis bridge influence the measurements by the firmware. | # The second opamp in the [[https://en.wikipedia.org/wiki/LM358 LM385]] was used as a [[http://www.learningaboutelectronics.com/Articles/Voltage-follower voltage follower]] to decouple the thermosensor and not have the hysteresis bridge influence the measurements by the firmware. | ||
| Regel 72: | Regel 78: | ||
[[Bestand:board-red-laser-bridgeredux-1.01.svg|600px|board/pinning bridge board]] | [[Bestand:board-red-laser-bridgeredux-1.01.svg|600px|board/pinning bridge board]] | ||
| − | == V1.02 improvements == | + | ==V1.02 improvements== |
| − | |||
Desired improvements | Desired improvements | ||
| Regel 83: | Regel 88: | ||
# LED to signal temp overload/off. | # LED to signal temp overload/off. | ||
| − | = Temp sensor = | + | =Temp sensor= |
| − | |||
| − | |||
MBed code for readout of this type of sensor. | MBed code for readout of this type of sensor. | ||
| Regel 114: | Regel 117: | ||
So lets put a hard limit in the hardware/electronics at 55 or 60; and a soft/warning one in the LAOS firmware at 50 or so. | So lets put a hard limit in the hardware/electronics at 55 or 60; and a soft/warning one in the LAOS firmware at 50 or so. | ||
| − | = | + | = Outputs = |
| + | # pin05 /p0.9 - Laser/J39 - pin 3/4 (C/E, npn) | ||
| + | # pin06 /p0.8 - Laser/J39 - pin 1/2 (C/E, npn) | ||
| + | # pin22 /p2.4 - Outpt/J37 - pin 1/2 (C/E, npn) - Q1 NPN to ground - pin2 J27 | ||
| + | # pin21 /p2.5 - Outpt/J37 - pin 3/4 (C/E, npn) - Q2 NPN to ground - pin3 J27 | ||
| + | |||
| + | Laser relay enabled -- means relay on; means output on pin low. | ||
| + | |||
| + | =New back= | ||
[[Bestand:Laser-back-panel.svg||400px|new laser back panel]] | [[Bestand:Laser-back-panel.svg||400px|new laser back panel]] | ||
| Regel 124: | Regel 135: | ||
# Move the side-ingress to the back too. | # Move the side-ingress to the back too. | ||
| − | = New front panel = | + | =New front panel= |
[[Bestand:Laser-red-panel.svg||400px|new laser front panel]] | [[Bestand:Laser-red-panel.svg||400px|new laser front panel]] | ||
| Regel 133: | Regel 144: | ||
* Next revision - make holes 0.5mm smaller. | * Next revision - make holes 0.5mm smaller. | ||
| − | = Knopje voor X/Y = | + | =Knopje voor X/Y= |
| − | |||
We hebben een printout van Mowi haar: | We hebben een printout van Mowi haar: | ||
| Regel 145: | Regel 155: | ||
maar helemaal goed passen ze niet. De click is het probleem. | maar helemaal goed passen ze niet. De click is het probleem. | ||
| − | = Top Boardje = | + | =Top Boardje= |
<gallery> | <gallery> | ||
| Regel 152: | Regel 162: | ||
</gallery> | </gallery> | ||
| − | = Firmware = | + | =Firmware= |
| − | |||
https://github.com/MakerSpaceLeiden/Firmware | https://github.com/MakerSpaceLeiden/Firmware | ||
| − | = Laatste situatie = | + | =Laatste situatie= |
| − | |||
Met oude firmware werkt de X/Y, etc. En de eindschakelaars werken. | Met oude firmware werkt de X/Y, etc. En de eindschakelaars werken. | ||
| Regel 165: | Regel 173: | ||
De nieuwe firmware werkt nog niet. De stappers gaan wel aan - maar er beweegt niets. | De nieuwe firmware werkt nog niet. De stappers gaan wel aan - maar er beweegt niets. | ||
| + | |||
| + | |||
| + | </tab> | ||
| + | </tabs> | ||
Huidige versie van 6 mrt 2024 om 16:25
This equipment is Noise Category 3: Can be used at all hours. No limits.
This equipment is safety category 3:
- Mandatory, in person, instructions.
- Make sure you read the Wiki before asking.
This Machine has been discontinued in March 2024.
It now lives in storage op het zoldertje.
No picture available.
Red Laser Cutter / Engraver
This machine is out of order !
It is currently being rebuild by Dirk-Willem (started 2020-1)
Rebuild_
The red laser is being rebuild - with a 450 nm laser.
Files are kept at [github].
Safety
Er is een speciale rode Laser safety google; en de HV voeding zit er nog wel in - maar zou in theorie niet aan moeten gaan. Het water circuit is schoon/droog geblazen.
Raam
Gebruikt is 2 lagen CN100-15000 - met lage transmissies voor golflengtes onder de 500nm.
Build info

It seems we have a LAOS rev 4 board (https://redmine.laoslaser.org/projects/laos/wiki/Mainboard_Revisions).
The NTC of the laser is not according to the docs - but the other way round; and no 10k resistor. Note that the wiring labels are on the bottom of the tab with the connector (at the laser head end).

Todo:
check that this patch is applied: https://redmine.laoslaser.org/issues/68check clearance near front on top of laser- check various bolts - most seem to miss their washers.
- Rework interlock design (overtemp, lid)
Bridge printje
Should:
- only power up laser if interlocks are ok
- and there is an ENABLE from the LAOS board
- and the temperature is not too high
- buzzer if the temp is too high
- some hysteresis on the temp
- some indicator of power & laser/relay on.
- Leave all else to the PWM control
V1.00 version

Actual values may differ to schematic - depending as to what was on the table/scraps-jar.
V1.01

- The second opamp in the [LM385] was used as a [voltage follower] to decouple the thermosensor and not have the hysteresis bridge influence the measurements by the firmware.
- Dat tapje voor de CPU klopt niet - die zit in werkelijkheid aan de kant van de opamp; voor de voltage divider
- Die 1k weerstand in de feedback loop is iets van 100-300 ohm; om een hogere beta te krijgen

V1.02 improvements
Desired improvements
- 0.5 Hz filter on the temp input
- Some 'there is a PWM no matter how short' thing driving an LED.
- Decent reverse polarity protection
- Relay to drive air pump
- Same size as LAOS print and then perhaps use headers to nest-stack. So the LAOS board sits on top - and we do not need to mess with inter bord cabling.
- LED to signal temp overload/off.
Temp sensor
MBed code for readout of this type of sensor.
float raw2volt(unsigned short raw) {
  const float VCC = 3.3f;
  return raw * VCC / (1<<16);
}

float volt2temp(float Vin) {
  #define K2C (273.15) // 0 C in Kelvin
  #define T25 (K2C + 25.0f) // 25 C in Kelvin

  // NTC resistor spec from datasheet.
  #define Bntc  (3435.0f)

  // Reference voltage and resistor to ground.
  #define Vref (2.495f)
  #define Rntc (10*1000.f)       // At 25 C
  #define Rref (10*1000.f)

  return 1.0f / ( log((Vref/Vin- 1))/Bntc + 1/T25) - K2C;
}
If we assume a InGaN diode/die - then we probably should stay well under 65 Degrees Celcius.
So lets put a hard limit in the hardware/electronics at 55 or 60; and a soft/warning one in the LAOS firmware at 50 or so.
Outputs
- pin05 /p0.9 - Laser/J39 - pin 3/4 (C/E, npn)
- pin06 /p0.8 - Laser/J39 - pin 1/2 (C/E, npn)
- pin22 /p2.4 - Outpt/J37 - pin 1/2 (C/E, npn) - Q1 NPN to ground - pin2 J27
- pin21 /p2.5 - Outpt/J37 - pin 3/4 (C/E, npn) - Q2 NPN to ground - pin3 J27
Laser relay enabled -- means relay on; means output on pin low.
New back

Using 15x3mm Parkers
- To replace the US/UK connectors & something safer.
- Move the ethernet to the back and turn into a plug
- Move the side-ingress to the back too.
New front panel

New front panel - with the i2c display build in. Above file can be sent to the LaserSaur with speed 500 and 80%.
- Question: Should we have a laser switch ?
- Next revision - make holes 0.5mm smaller.
Knopje voor X/Y
We hebben een printout van Mowi haar:
en
maar helemaal goed passen ze niet. De click is het probleem.
Top Boardje

Top board

Top board


Firmware
https://github.com/MakerSpaceLeiden/Firmware
Laatste situatie
Met oude firmware werkt de X/Y, etc. En de eindschakelaars werken.
Interlock laser werkt (relay valt af).
Met de iotest kan je met '4' inderdaad de laser aan uit zetten.
De nieuwe firmware werkt nog niet. De stappers gaan wel aan - maar er beweegt niets.