Node TigWelder
PoE powered Node on AC voor de Tig Welder.
Inhoud
[verbergen]Swipe ok - but does not want to turn on
- Do you see waiting for card on the display ? If so - it has not read your card (yet).
- Did you hear a beeb when you swiped ? If so - your card is picked up ok.
- Did you hear 3 or more beeps when you swiped ? If so - your card is not getting permission from the system
- Does your personal page in mijn.makerspaceleiden.nl show that you have permission ?
- Is the internet in the space up and running ?
The Machine does not want to accept my badge
- Do you hear a beeb when swiping ? If so - it has read your card.
- Did it work on the door ?
- Does it work on any other machine ?
- Have you checked your personal page in mijn.makerspaceleiden.nl - you are sure you have access ?
Electronics
De node is AC powered; en zit 'voor' alle electra van het TIG apparaat.
OPTO1 wordt gebruikt om spanning na de on/off switch the detecteren.
OPTO2 wordt gebruikt om de spanning van de drukknop op de toorts te detecteren.
Het SSR relay onderbreekt de spanning naar de on/off schakelaar.
De node is gebaseerd op de Black 2025 boards. Machine specific wiring:
- SSR relay voor power
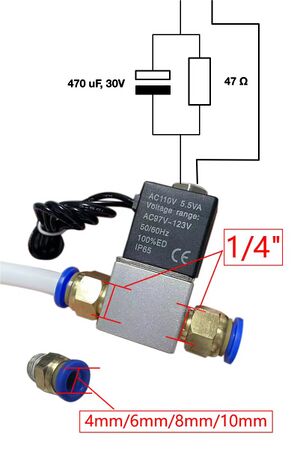
- 12V digitale output voor de klep
- Opto voor spanning
- Opto voor detectie lassen
Solenoid Wiring
The 12V solenoid uses about 0.5 Amp/6Watt when fully engaged. This makes it relatively hot; and also is a stretch for the AC/DC power unit used. So after a high on-peak current- we reduce this to about 1/3 once engaged with a resistor. See https://www.electronicdesign.com/technologies/analog/article/21798400/whats-all-this-solenoid-driver-stuff-anyhow for details.
Board jumpers and settings
Board - serie nummer 4
- Rework 1 - verwijderen ESD diodes antenne
- Rework 2 - omdraaien transistors programmering
Note: een van de program-transistors is vervangen door iets willekeurigs
Jumpers:
- Vint, 12 volt
- Vpoe/SS - all off
== Bill of material
| AC/DC 12V | ~2€ |
| Solenoid 12V | ~9€ |
| Current coil | ~1.50€ |
| Connector | ~1.50€ |
| OLED display | ~3.50€ |
| Buttons x3 | ~0.30€ |
Green Connector
| PIN | Description | Use |
|---|---|---|
| 1 | CUR2 | NC |
| 2 | CUR2 | NC |
| 3 | OPTO 4 | NC |
| 4 | OPTO 3 | NC |
| 5 | OPTO 2 | N for torch sense |
| 6 | OPTO 2 | Torch sense |
| 7 | OPTO 1 | N for voltage sense |
| 8 | OPTO 1 | Voltage sense |
| 9 | L input | L, connected |
| 10 | N input | N, connected |
| 11 | Relay 1 NO | L power |
| 12 | Relay 1 Common | N |
| 13 | Relay 2 NO | NC |
| 14 | Relay 2 NC | NC |
| 15 | Relay 2 common | NC |
Checklist node
Doel checken is
- Machine mag niet anders aan gaan dan met de schakelaar voorop
- Powercycle van de node moet geen rare situaties opleveren
- Spanningsonderbreking moet machine in veilige stand brengen.
- Timeout na X minuten moet de machine ook in veilige stand brengen.
- Machine mag nooit uit (of aan) gaan zonder gebruikers actie. Dus node/netwerk/etc verlies of een timeout mag niet leiden tot uitgaan of aangaan van de motor.
Stappen:
- Powercycle de node. Komt die terug op het netwerk ?
- Na powercycle; kan je de unit niet aan zetten ?
- Swipe, check dat de machine werkt. Zet hem uit. Onderbreek de stroom > 1 seconde en controleer dat de machine weer in de veilige stand staat.
Source code
https://github.com/MakerSpaceLeiden/AccessSystem/lib-arduino/ACNode/examples/TigWelderNode
Bypassing the node
With the explicit permission from a trustee - a node can be bypassed. For example when it is broken. There are two dip switches on the board.
Obviously - doing so without the express permission is a sure way to loose your membership.
History
Build late 2024
