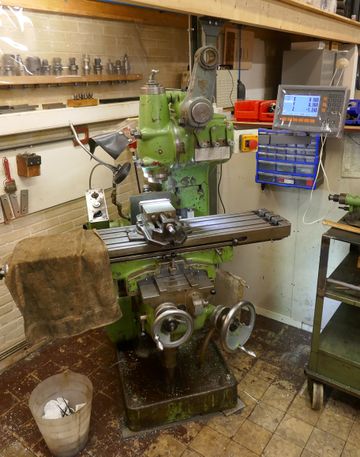
Abene Metal Mill / Freesbank
See github for documentation. [1]
Inhoud
Status
Operational - maar instructie check-list en andere zaken nog niet helemaal klaar. Hulp zeer welkom. Probeer het voorlopig bij Aart, Henry, Alex or Dirk-Willem (TBD).
Classification
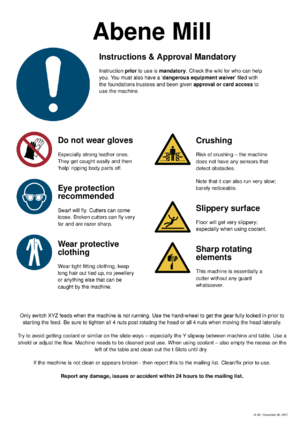
- Gevaarlijke machine - inleveren van de bekend met risico's gevaarlijke apparaten formulier bij bestuur verplicht.
- Instructie & OK bestuur verplicht
- Mag op alle uren gebruikt worden; hou wel rekening met de buren.
- Aanwezigheid tweede persoon aanbevolen maar niet verplicht.
Maatregelen
- Gebruik van handschoenen verboden
- Geen loshangende haren, sieraden, kleding, ringen, armbanden.
- Gebruik van een veiligheidsbril is verplicht.
- Zorg dat je weet waar de noodstoppen zitten.
Belangrijkste veiligheidsaandachtspunten
- Gegrepen worden door de draaiende delen.
- Bewegingen van de assen, beknelling.
- Scherpe snel draaiende messen
- Scherpe spaanders, rondspattende spaanders en vonken.
- Rondspatten afgeproken onderdelen (tanden frees, afgebroken as).
- Tijdens verplaatsen XYZ tafel - botsingen met de draaiende frees/zaag of opbouw van extreme elastische spanning en breuk.
- De vloer kan erg glad worden als je de koelvloeistof gebruikt.
Aandachtspunten gebruik
- Als je gereedschappen moet wisselen - zet de ISO-40 taper dan niet direct vast in de bankschroef - maar gebruikt het kubus-vormige houdertje (dat je dan in de bankschroef vast zet). Dit om te voorkomen dat er krassen/deuken in komen (wat weer tot gevolg heeft dat de kop gaat slippen/wiebelen). Laat de ISO-40 taper vooral ook niet vallen. Ze zijn relatief kwetsbaar.
- Schakel de feeds rusting en check dat het tandwiel er in valt - draai indien nodig aan de handwielen om ze er in te laten vallen (dus `geen tanden poetsen'!).
- Pas op met botsingen tussen kop en X/Y/Z bewegingen - met name als je de fast-feed gebruikt.
- Bij te snel/veel schakelen kan de Z as engaged raken zonder dat je het wil.
- Let of dat er geen boormelk buiten de bak komt - indien nodig schotje over de slides zetten.
- Na gebruik boormelk goed schoonmaken -- ook de T-slots. Eventueel rechter bakje in linker bakje scheppen.
- Draai ALTIJD de 4 bouten van de kop aan na verdraaien of de 4 op de diagonale slide way na veranderen hoogte. ALTIJD.
- Respecteer de eindstoppers. Met name de onderste Z stopper. Anders loopt de zaak mogelijk vast (en dat kost al gauw 40€ aan nieuwe olie).
- De collets zijn alleen geschikt voor hun eigen maat -- dus stop er geen freesjes zonder draad in die 0.5 mm dikker of dunner zijn. Dan breekt het collet (rond de 75 euro voor een nieuwe uit china).
Gereedschappen
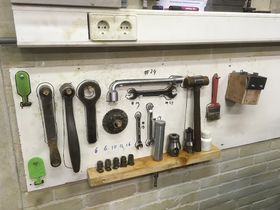
Er zijn een aantal gereedschappen die bij de Abene horen. Deze hangen op het bord erachter. Zorg dat ze niet wegraken - een aantal is erg lastig/duur te vervangen. Van links naar rechts:
- T scrapers - gebruikt om de gootjes schoon te houden. Nieuwe kunnen geprint worden via [scraper op Thingiverse]. Volgende versie zou iets dikker en groter mogen.
- Hendel - voor de bankschroef.
- Sleutel - voor de moeren die de kop van de machine vastzetten (4 stuks bovenop de schuine baan, 4 stuks rond de draaikop). Deze altijd goed vastzetten voor gebruik.
- Sleutel voor de snel-wissel collet.
- Sleutel 24 voor het verplaatsen van de bankschroef en andere T slot bouten.
- Plastik hamer. Gebruik *NOOIT* een metalen hamer (gereedschapmmetaal op metaal kan spatten).
- Kwast om spaanders weg te vegen.
- Zaagjes. Een aatal hiervan zijn geschikt voor tandwielen. Er liggen kleinere in de laatjes links.
- Sleutel 19/24 voor de tapers, verdeelplaat instelling en de moer aan het eind van de arbors.
- Sleutel 13 voor de eindstoppers.
- Sleutel 14 voor de drawbar van de iso40 taper (bovenop het apparaat).
- Nog een T-scraper
- Snelwissel houdertjes voor de collet in 6, 10, 12 en 16 mm.
- Vetspuit
- opsteekfreesdoorn / taper houder voor in de werkbank om de collet goed te kunnen losmaken zonder beschadiging
- iso40 opsteekfreesdoorn (taper) met collet
- potje Booroilie
- M22 arbor houder Met een langsspiebaan (drive key for milling tools with longitudinal groove) en zonder dwarsspiebaan op de M22. Bout M8.
On de kast
- Grote M22 arbor - voor horizontaal gebruik. Met een langsspiebaan (drive key for milling tools with longitudinal groove) en zonder dwarsspiebaan op de M22. Bout M8.
Let op als je iets besteld: 1) We hebben geen M22 taper/opsteekfreesdoorn met dwarsspiebaan (onze opsteekfreesdoorn zijn geen combi types). Dus zorgen dat het een spie hapje heeft - of er ook een (combi)opsteekfreesdoorn met dwarsspiebaan bij bestellen. En 2) de collets zijn het type met draad op het eind en in de schacht maten 6, 10, 12 en 16mm. We hebben dus geen gladde collets.
Eigenschappen
De opsteekfreesdoorn (taper) is een ISO-40 met twee uitsparingen (vgl. NT40, MT40, 40-Int) voor de dwarsspiebaan op de machine zelf.
We hebben één snelwissel cotllet met 5 inserts met draad in de maten: 16mm, 12mm, 10mm en 2x 6mm (zowel doorsnee als M-draad aan einde frees).
De T-slots zijn 18mm breed. De blokjes zijn 25mm breed en zitten vast met M16 bouten( (sleutel 24). De gootjes zelf wat groter - richting 28mm breed en ruim 10mm hoog. (nog op te meten!)
De arbors (vertikaal-kort en horziontaal lang) zijn 22m/arbor met key (drive key for milling tools with longitudinal groove).
We hebben op dit moment geen ISO-40 taper met 22mm rond/arbor en twee blokjes (drive ring for milling tools with transversal groove).
Operating the machine
The machine has a safety relay. This stops the machines from starting unattended.
To power on the machine:
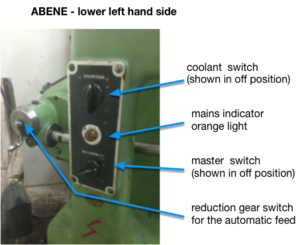
- Ensure that the round on-off switch on machine (bottom of the pedestal on the side, below the orange light) is in the vertical off position.
- Ensure that pump switch (bottom of the pedestal on the side, below the orange light) is in the vertical off position.
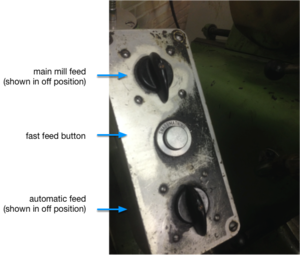
- Ensure that the feed and mill buttons are in the vertical off position (top of the pedestal).
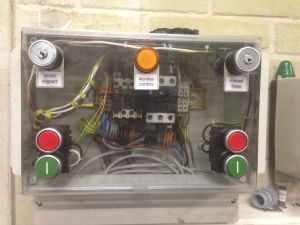
- Press the green 'on' button on the wall control box (to the left of the machine; right most buttons).
- The blue light on the wall should come on. If not - check that the switch on the current limited (small box next to the control box) is in the ON setting.
- Use the on-off switch on machine (bottom of the pedestal, below the orange light) to switch it on.
- The orange light on the machine should come on.
To power off the machine:
- Ensure that all the on-off switches on the machine the off position (all 4 of them).
- Press the red 'off' button on the wall control box (to the left of the machine).
To put the machine into `out of order' mode.
- Ensure that all the on-off switches on the machine the off position (all 4 of them).
- Press the red 'off' button on the wall control box.
- Take the key which is inside the control box and use that to operate the keylock of the grinder; setting it it '0'.
- If you are very concerned about someone re-enabling it - then hand the key to one of the trustees or put it in the mailbox of a trusteed (the one where you sent the [liability waiver] to).
- Report the issue to the mailing list.
Controls
The main controls are on the lower right hand side.
Note that the feed reduction gearbox may require you to operate the cardanic/telescopic shaft by hand a bit to make it 'click'.
The operator controls are on top of the control pedestal. The main mill switch will cause the mill to operate clockwise (e.g. as needed for a normal drill ) when turned left (i.e. in the observable direction of the head when it is in the down position). Turning it clockwise causes the mill to rotate clockwise (again - when seen from the 'front').
You need to give it an extra push-turn to cause the relay to activate; and then let go.
The bottom switch will start the automatic feed (assuming one of the feed levers is engaged).
Pressing the fast feed button will move the table fast. Be very careful with this - the feed is strong and a head crash will break your drill/bit (or worse; e.g. damage the collet or you -- neither of which is cheap or easily replaced).
Bekende problemen
Problemen die we (nog) niet opgelost hebben.
koel/boorvloestof loopt niet
Er is mogelijk een probleem met de boormelk (overleg gaande met leverancier). Indien het na 20-30 seconden niet gaat lopen; met de perslucht blazer 10-20 seconden doorblazen vanaf de nozzle bij de kop (dus in tegengestelde richting). Dan 20-30 seconden de kans geven om te gaan lopen. Herhaal indien nodig.
Onze boormelk was verlopen of is te koud geworden -- er komt nieuwe aan.
Versnellings bak feedsnelheid pakt niet
Disengage alle XYZ. Draai het handeltje langzaam een beetje naar links en naar rechts terwijl je met de hand de kardan as wat draait.
De voeding voor de lamp is een rommeltje
De voelding ligt nu los onder in de machine. Verre van ideaal. Moet bedacht worden hoe we dit beter kunnen doen.
Z as gaat soms vanzelf lopen als je de Y schakelt bij stille X.
Onduidelijk waarom - maar soms gaat de Z as spontaan 'engaged' en zakken tijdens het schakelen van de Y -- mogelijk in combinatie (alleen ) met een ontkoppelde X.
To procure/find
ISO 40 with drill chuck. Or MT4/ISO40 in which the chuck of the lathe would fit (perhaps HBM 02594)(besteld, midden Jan., dirkx).Light-- but now we need a longer/stronger flexible arm.
Very optional:
- Set of ER32 collets for ISO 40 or similar.
- Mounting fixtures e.g. a simple version of http://www.fritshansen.nl/winkel/gereedschappen/opspanset-t-120-52-delig/
- Vulplaatjes/vul-staafjes, parallel staafjes in diverse maten.
To make/find/buy or 'do'
- Plank ophangen.
- Beter horziontaal zetten - moet mogelijks links voor nog iets extras onder de voet (Hans heeft een perfecte tandenstoker hiervoor).
- Goede inventory maken van de frezen en boren. Verstoppen van de rare maten die de collets stuk maken bij gebruik.
- Voeding lampje vastmaken. Ligt nu los.
Lubrication History
Details on github: [2]
The actual advice from Abene (late 2017) is much simpler:
- Q8 Goya NT68 (gear oil) spindle and feed gear box)
- For everything else, Q8 Wagner NT68 (Slideway lube)
Current situation
- Main drive gearbox, spindle gearbox, drive gearbox on the left.
- Replaced with Hykrol HLP ISO-VG 100 (ISO 100 hydraulic oil), 2017-11-19. 5L was about sufficient all 3 gearboxes.
- Overarm bearing
- Emptied and cleaned 2017-11-19. Not yet replaced.
- Sideways
- Emptied and cleaned 2017-11-12. Replaced by sideway oil 68 - 2017-12-15.
- Kneejacking screw
- Emptied and cleaned 2017-11-29. Replaced by ISO 46 hydraulic oi.l 2017-11-29.
- Headstock and motor bearings.
- Emptied and cleaned. 2017-11-29. Replaced by ISO 100 hydraulic oil. 2017-11-29.
- Coolant
- Emptied and cleaned - not able to reach all parts. Replaced by 1:10 mix. 2017-12-15. Zie"http://www.oliehandel.nl/eurol/eurol-boorolie-a" voor details.
Nog te doen:
- Diverse lagers kunnen een dot dik vet gebruiken (achter de ronde luikjes).
Disassembly Notes
- When removing the X table - either remove the spindle first -or- make sure that when you put the X table on a cart you use blocks to not bend the then very exposed spindle.
- When removing the gearbox in the knee it is *crucial* to first remove the guiding pin. This allows you to rotate the unit some 10 degrees clockwise to lift the crownwheel. You *will* break a teeth from the crownwheel otherwise !
Electrics
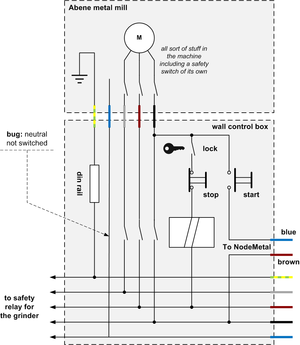
Aart has a tentative schematic of the machine. It has its own safety relays.
The emergency stop is wired into the overheating sensor of the main engine; and interrupts power to the main power relay.
The machine has a N (blue) feed - it is not used. The extra light has been connected to the 110V transformer.
The fast feed works by reversing the direction of the feed motor. It then mechanically bypasses the reduction gear and directly drives the telescopic/card feed shaft.
Junction box on the wall
The wall junction box contains a normal start/stop safety relay. It is flanked by a power/current limiter which is set to a fairly conservative value (inside the box with the blue light on it).
The situation around the start-button & Neutral is not ideal. Main reason is that we could not fit the normal NO/NC companion contacts on top of the power relay due to not having enough height. This is deemed acceptable as the Abene has its own full complement of safety relays and what not.
