Router Table Wood / Tafelfrees hout: verschil tussen versies
(→Setup) |
|||
| Regel 13: | Regel 13: | ||
==Setup== | ==Setup== | ||
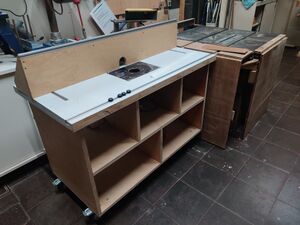
| − | The current setup was made by Ruud, Thomas and Hedde. Initially the table was made for a hand-made insert (by Alex) with a Bosch router, but the current insert and router were purchased new. The table was designed so that it is mobile (large lockable wheels) and has the same height as the large saw table. | + | The current setup was made by Ruud, Thomas and Hedde. Initially the table was made for a hand-made insert (by Alex) with a Bosch router, but the current insert and router were purchased new. The table was designed so that it is mobile (large lockable wheels) and has the same height as the large saw table. As such it can serve as support for the saw table and the saw table can be used as support for large pieces for the router (see second image). |
| − | As such it can serve as support for the saw table and the saw table can be used as support for large pieces for the router. | + | |
| + | |||
| + | |||
| + | [[Bestand:Router tafel tafelzaag.jpg|right|thumb]]The router table is still under construction, the following steps still need to be taken (19 june 2023): | ||
| + | |||
| + | # Electrical control box and connection with tag | ||
| + | # Finish 2 lower large drawers | ||
| + | # Make a door for the router (thick plexiglass if available) | ||
| + | # Add holes in back and check dust suction with test runs (door of 3 is needed) | ||
| + | # Test runs (initial tests have been done 18-6 and seem OK)<br />NB: Make sure to NOT tighten the collet without a bit; the collet can get stuck! | ||
| + | # Test Finger boards and add ons | ||
| + | # Make fronts for drawers and door for cabinet top right | ||
| + | # Organize everything and update this wiki-page | ||
| + | # Formulate instructions and add to permissions system + give instructions | ||
| + | |||
| + | |||
| + | |||
| + | Do YOU want to help with any or all of the above? PLEASE! Contact Hedde or Ruud. Or just mail to all deelnemers. | ||
| + | |||
| − | |||
| − | |||
| − | |||
| − | |||
| − | |||
| − | |||
| − | |||
Wil je meehelpen met een of meerdere van bovenstaande, graag! Neem contact op met Ruud, Thomas of Hedde. Of mail gewoon de deelnemers. | Wil je meehelpen met een of meerdere van bovenstaande, graag! Neem contact op met Ruud, Thomas of Hedde. Of mail gewoon de deelnemers. | ||
Versie van 19 jun 2023 om 18:23
Inhoud
General
This equipment is safety category 3:
- Mandatory, in person, instructions.
- Make sure you read the Wiki before asking.
This equipment is Noise Category 2:
Can be used at all hours, but in moderation.
Be considerate; if you feel you need to wear ear protection,
then only use the tool between 07:00 and 19:00.
This equipment MUST be used with active dust control:
- Connect a shop-vac prior to use and keep it on while using it.
- Let it run for 10-20 seconds post use.
Not doing so endangers the operator, others, the space and the equipment.
Regarding the DeWalt Wood Chip Extractor:
- Do not fill the bag past 2/3rd of its capacity.
- Check for enough airflow before using the connected tool.
- Check that there is no (hot/smoldering) wood in the bottom of the machine when you smell something.
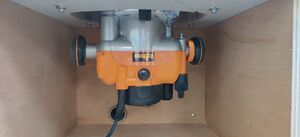
The large router table has a high-power inverted router (Triton TRA001, 2400 W) on an insert plate (Marman Tools IP2.0K-TRI).
The router table is currently still under construction and NOT yet in use. Would you like to help with the next steps? Please!
Below is a list of the to-do's; for further information contact Ruud or Hedde.
Setup
The current setup was made by Ruud, Thomas and Hedde. Initially the table was made for a hand-made insert (by Alex) with a Bosch router, but the current insert and router were purchased new. The table was designed so that it is mobile (large lockable wheels) and has the same height as the large saw table. As such it can serve as support for the saw table and the saw table can be used as support for large pieces for the router (see second image).
The router table is still under construction, the following steps still need to be taken (19 june 2023):
- Electrical control box and connection with tag
- Finish 2 lower large drawers
- Make a door for the router (thick plexiglass if available)
- Add holes in back and check dust suction with test runs (door of 3 is needed)
- Test runs (initial tests have been done 18-6 and seem OK)
NB: Make sure to NOT tighten the collet without a bit; the collet can get stuck! - Test Finger boards and add ons
- Make fronts for drawers and door for cabinet top right
- Organize everything and update this wiki-page
- Formulate instructions and add to permissions system + give instructions
Do YOU want to help with any or all of the above? PLEASE! Contact Hedde or Ruud. Or just mail to all deelnemers.
Wil je meehelpen met een of meerdere van bovenstaande, graag! Neem contact op met Ruud, Thomas of Hedde. Of mail gewoon de deelnemers.
Basis regels
De router tafel is nu nog niet in gebruik, gebruik de Router_Table_/_Tafelfrees als je geïnverteerd wilt frezen.
Verplichte meldingen
- De gebruiker *moet* melding maken van mankementen of storingen.
- Ongelukken en bijna ongelukken moeten gemeld worden (alles waar meer voor nodig is dan een simpele pleister).
Voor gebruik
- Controleer of de machine schoon is; en niets defect lijkt.
Wat betreft de machine schoon en veilig achterlaten - per algemene makerspace regel is dit altijd de verantwoordelijkheid van de *laatste* gebruiker. Dus als je de troep van een ander niet wil opruimen; meld het dan - en gebruik de machine niet. Zodra je iets gebruikt ben je verantwoordelijk voor het in goede en schone staat achterlaten van de machine; en het melden van storingen of defecten.
Gebruik
...Nog toe te voegen...
Na gebruik
- Machine goed schoonmaken; ook van binnen waar de router zich bevindt.
- ...
Instructie
De instructie ...
Problemen en defecten melden bij: deelnemers@makerspaceleiden.nl
Ongelukken melden bij: bestuur@makerspaceleiden.nl

