Drill Press Metal / Kolomboor metaal: verschil tussen versies
(→Nog te doen) |
|||
| Regel 70: | Regel 70: | ||
# '''Report the issue to the mailing list.''' | # '''Report the issue to the mailing list.''' | ||
| − | + | == Drilling Speed Table == | |
| − | ==Drilling Speed Table== | ||
Depending on material, hole diameter and thickness of the matterial there is an advised drilling speed. A table is mounted on the right side of the machine. | Depending on material, hole diameter and thickness of the matterial there is an advised drilling speed. A table is mounted on the right side of the machine. | ||
Or see http://engineering.ucdavis.edu/wp-content/uploads/2013/08/lathespeeds.pdf | Or see http://engineering.ucdavis.edu/wp-content/uploads/2013/08/lathespeeds.pdf | ||
| + | |||
| + | Always use the right speed; you get a nice round hole, it goes faster and the drills stay sharp. | ||
The larger your drill diameter - the lower the speed (Alu faster than steel faster than stainlesssteel/rvs); but limit countersinks/counterbores/stepdrills and similar `specials' to 200-300RPM. | The larger your drill diameter - the lower the speed (Alu faster than steel faster than stainlesssteel/rvs); but limit countersinks/counterbores/stepdrills and similar `specials' to 200-300RPM. | ||
| + | |||
| + | For more info about the drilling speeds see [[Boorsnelheid RPM drilling speed]]. | ||
| + | |||
| + | == Oil == | ||
| + | |||
| + | There are three types of oil next to the machine. For most metals use the green oil. | ||
| + | |||
| + | Use the non-ferro oil if you find that the green oil stains your aluminiun/non-ferro metal (this is quite rare). | ||
| + | |||
| + | The third oil is generally not suitable to use with this drill press. | ||
=Nog te doen= | =Nog te doen= | ||
Versie van 2 okt 2024 om 20:14
This equipment is safety category 3:
- Mandatory, in person, instructions.
- Make sure you read the Wiki before asking.
This equipment is Noise Category 2:
Can be used at all hours, but in moderation.
Be considerate; if you feel you need to wear ear protection,
then only use the tool between 07:00 and 19:00.
Inhoud
Classification
- Veiligheidscategorie 3, instructie verplicht
- Geluidscategorie 2, kan 24/7 gebruikt worden. Houd rekening met de buren.
- Registratie in mijn.makerspaceleiden.nl.
- This equipment is safety category 3, Mandatory instructions.
- Noise category 2, can be used 24/7. Be considerate of the neighbours.
- Registration in mijn.makerspaceleiden.nl
Maatregelen
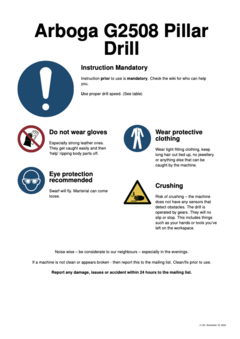
- Gebruik van handschoenen verboden.
- Geen loshangende haren, sieraden, kleding, ringen, armbanden, touwtjes hoodie.
- Gebruik van een (veiligheids)bril is verplicht.
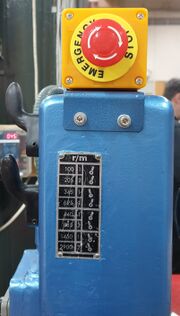
- Zorg dat je weet waar de noodstop zit.
Belangrijkste veiligheidsaandachtspunten
Risico’s bij gebruik zijn:
- Gegrepen worden door boorkop
- Boren in dun plaatmateriaal met te grote boordiameters
- Rondvliegende spanen
- Losschieten werkstuk
- Snijden aan spanen tijdens opruimen
Aandachtspunten gebruik
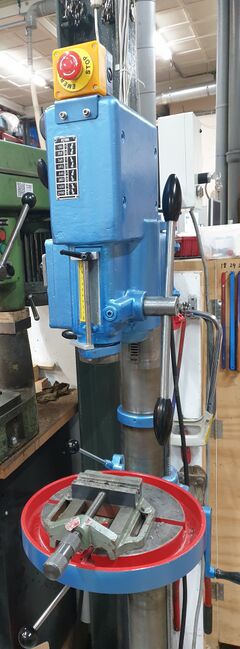
- De Arboga kolomboormachine is een tandwiel aangedreven boormachine met een boorcapaciteit van 30 mm in massief staal (grotere diameters alleen mogelijk met conische boren). Het toerental kan door middel van twee mechanische hevels en een elektrische schakelaar variëren van 100 tot 2900 toeren.
- De twee mechanische schakelhevels die de mechanische toerental wisseling regelen hebben een duidelijke klik in de uiterste stand. Als de schakelhevels niet vanzelf in de uiterste stand belanden dan moet de boorkop met de hand iets gedraaid worden totdat een duidelijke klik gehoord wordt.
- De schakeling met de mechanische schakelhevels moet ALTIJD (!!) in stilstand gebeuren.
- Zowel de boortafel als de boorkop kunnen in hoogte worden versteld. In vrijwel alle gevallen valt het verstellen van de boortafel te prefereren. Door de boortafel te zwenken en te verdraaien is een groot aantal posities van het werkstuk in geborgde positie bereikbaar.
- Het verdient de hoogste aanbeveling om het werkstuk te klemmen in een daarvoor bestemde boorklem, of bij grotere werkstukken, met een passende lijmtang. Het komt niet alleen de zuiverheid van het te boren gat ten goede maar bovenal is het veel veiliger. Mocht om welke reden dan ook het werkstuk losraken van de klemming en rond de boor gaan draaien probeer het dan NOOIT (!!) met de hand te stoppen. Druk op de noodschakelaar en doe een stap achteruit.
- De boorkop (MC3) heeft een capaciteit voor boren vanaf 2 tot 16 mm en is zelfklemmend. De boorkop kan eenvoudig gewisseld worden door de draaibare lip tussen boorkop en boorkolom te verdraaien. Daarna kunnen spiraalboren met een MC3 conus direct in de boormachine worden geplaatst (op dit moment niet aanwezig op de Space). Ook kan een tapkop of grote verzinkboor (beide ook niet aanwezig op de Space) direct op de MC3 vatting worden aangesloten.
- Gebruik van de kolomboor is uitsluitend toegestaan na een korte algemene instructie!
Operating the machine
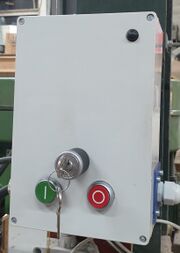
The machine has a safety relay (on the pillar behind the machine). This stops the machines from starting unattended.
To power on the machine:
- Ensure that the black on-off switch on the machine (on the leftside of the head) is in the vertical -middle- off position.
- ensure that the key switch on the safety relay is in the "I" position.
- Press the green 'on' button on the safety relay.
- Use the black on-off switch on the machine to switch it in eithwer the "I" or "II" postion.
- The machine will start drilling..
To power off the machine:
- Ensure that the black on-off switches on the machine is in the vertical -middle- off position.
- Press the red 'off' button on the safety relay.
To put the machine into `out of order' mode.
- Ensure that the black on-off switches on the machine is in the vertical -middle- off position.
- Press the red 'off' button on the wall control box.
- Set the key switch on the safety relay in the "0" position and remove the key.
- If you are very concerned about someone re-enabling it - then hand the key to one of the trustees or put it in the mailbox of a trusteed (the one where you sent the [liability waiver] to).
- Put a note on the machine stating that it is "Out of Order" with your name and date on it.
- Report the issue to the mailing list.
Drilling Speed Table
Depending on material, hole diameter and thickness of the matterial there is an advised drilling speed. A table is mounted on the right side of the machine.
Or see http://engineering.ucdavis.edu/wp-content/uploads/2013/08/lathespeeds.pdf
Always use the right speed; you get a nice round hole, it goes faster and the drills stay sharp.
The larger your drill diameter - the lower the speed (Alu faster than steel faster than stainlesssteel/rvs); but limit countersinks/counterbores/stepdrills and similar `specials' to 200-300RPM.
For more info about the drilling speeds see Boorsnelheid RPM drilling speed.
Oil
There are three types of oil next to the machine. For most metals use the green oil.
Use the non-ferro oil if you find that the green oil stains your aluminiun/non-ferro metal (this is quite rare).
The third oil is generally not suitable to use with this drill press.
Nog te doen
- smeernippels vrij van verf/gebruiksklaar maken
- 4 stelpoten waterpas stellen
achterwand maken en plaatsenbediening warmtelamp verplaatsen naar gangzijde van de pilaarQR-code sticker maken
Onderhoud
1 maal per kwartaal:
- Optische inspectie machine.
- Controle of de machine nog waterpas staat.
- Eventueel smeren als nodig.
Electrics
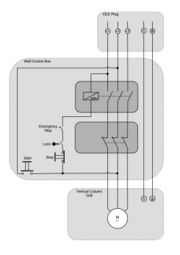
The emergency stop is wired into the safety relay.
Safety Relay
The safety relay is a box containing a normal start/stop safety relay. It is flanked by a power/current limiter which is set to a fairly conservative value. The coil operating the relay is a 400V type, so the N feed/wire is not connected/used.
