Metal Mitresaw / Afkortzaag Metaal: verschil tussen versies
(→Locatie) |
(→Also Known As) |
||
| (82 tussenliggende versies door 2 gebruikers niet weergegeven) | |||
| Regel 1: | Regel 1: | ||
[[Category:Tool]][[Category:Metal]][[Category:SafetySheet]] | [[Category:Tool]][[Category:Metal]][[Category:SafetySheet]] | ||
| + | [[Categorie:Tools]][[Categorie:Metal working tools]] | ||
| + | =What is the state= | ||
| + | <span style="color: rgb(255, 0, 0);" data-mce-style="color: #ff0000;">NOT READY -- main todo's</span> | ||
| − | |||
| − | |||
| − | |||
| − | |||
| − | + | [[Bestand:Handenverboden.png|right|middle|thumb|NoHands]]<span style="color: rgb(255, 0, 0);" data-mce-style="color: #ff0000;"></span> | |
| − | + | # Safety Scan op Github plaatsen | |
| − | + | # Safety Instruction Card | |
| − | # | + | # Usage Instruction Card |
| − | # | + | # Meggen van de motor ivm andere draden die we niet kunnen zien<br /> |
| − | |||
| − | # Safety | ||
| − | # | ||
| − | |||
| − | # Meggen van de motor ivm andere draden die we niet kunnen zien | ||
| − | |||
# Foto's maken van hoe de kap er af moet - met name fragile plastic deel. | # Foto's maken van hoe de kap er af moet - met name fragile plastic deel. | ||
# Kijken waar de trilling vandaan komt en dat vast zetten | # Kijken waar de trilling vandaan komt en dat vast zetten | ||
# Zorgen dat alle klauwen kunnen draaien -- moet waarschijnlijk gewoon even wat vet op. | # Zorgen dat alle klauwen kunnen draaien -- moet waarschijnlijk gewoon even wat vet op. | ||
| − | # | + | # Foto's accesoires op de wiki |
| − | # | + | # Opbergplek bedenken voor de geleide rails en het handle |
| + | # Autorisatie procedure uitwerken | ||
| + | # Medium Prio - Elektrische schema's in de Wiki | ||
| + | # Medium Prio - Locatie herbezien ivm dat metaal kan uitsteken | ||
| + | # Lage prio - Verplaatsen noodstop | ||
| + | # Lage prio - De klamp rood verven | ||
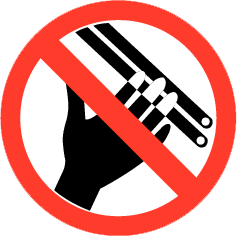
| + | # Lage prio - Pictogram voor niet met de hand vasthouden | ||
| − | = | + | =What is it?= |
| − | + | The Metal Mitre Saw is a mitre saw for metal. | |
| + | It differs from many other saws in that it has a slow-turning saw-blade and a cooling mechanism, allowing to cut metal without getting it hot. | ||
| − | + | The results are that you can have very streight and smooth cutting edges. | |
| + | The Metal Mitre Saw is located in the Welding area. | ||
| − | + | =Safety instructions= | |
| + | [[Bestand:Safetysheet-metalmitresaw.png|miniatuur|Safetysheet Metal Mitrsaw]] | ||
| + | {{SafetyCat2}} | ||
| + | {{NoiseCat2}} | ||
| + | Dust classification: NO | ||
| − | + | Fire classification: NO | |
| − | + | Gas Bottle: NO | |
| − | + | You need a proper instruction for using this machine properly. | |
| − | |||
| − | |||
| − | + | ==General pointers== | |
| − | + | Pay special attention to: | |
| + | * Getting caught by moving parts | ||
| + | * Getting cut by sharp edges | ||
| + | * Getting cut by flying splinters when something breaks | ||
| + | * Falling when the floor gets slippery from cutting fluid | ||
| + | * Damaging the machine when the object is not properly fixed and balanced | ||
| + | * Only cut workpieces of appropriate materials (only un-hardened metal <800N/m) | ||
| + | * Only cut workpieces of appropriate sizes (no sheet metal) | ||
| + | * If your workpiece is of significant size or weight, balance it properly | ||
| − | = | + | ==Before using it== |
| + | Check whether the machine is in proper order before using it. | ||
| − | + | If it is not, report such in the participants mailing list. | |
| − | |||
| − | |||
| − | |||
| − | |||
| − | |||
| − | + | Make it in proper order yourself; we do not have 'service personnel' to do this for us. | |
| − | + | Ask for help if needed. | |
| − | |||
| − | |||
| − | |||
| − | |||
| − | |||
| − | |||
| − | |||
| − | |||
| − | + | Checks: | |
| + | * Is the machine stable | ||
| + | * Is the blade not damaged and properly attached | ||
| + | * Is there sufficient cooling liquid | ||
| + | * Is the working area free of debris | ||
| + | * Is the floor free from obstacles and cutting oil | ||
| + | * Is there sufficient light to see what you are doing | ||
| − | + | ==While using it== | |
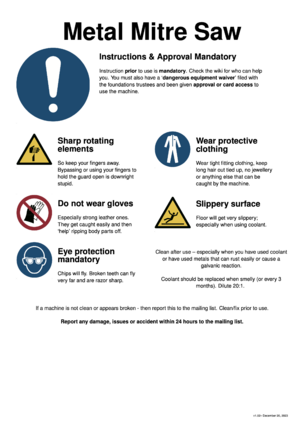
| − | + | * Do not wear gloves, because they can pull your hands into the machine. And once your hands are caught by the machine, it is difficult to turn it off | |
| + | * Do not wear clothes or jewels that can get caught - including rings | ||
| + | * Do wear safety classes for protection of splinters when something breaks | ||
| + | * Make sure you know where the safety buttons are | ||
| + | * Fix the workpiece with the clamp | ||
| + | * Do not hold the workpiece with your hands while cutting | ||
| + | * Do not put force on the handle while cutting | ||
| + | * Keep checking whether the workpiece is properly fixed<br /> | ||
| + | * Keep checking that no cutting fluid is spilled because the floor can become slippery | ||
| − | + | ==After using it== | |
| + | Check whether the machine is in proper order after using it. | ||
| − | + | If it is not, make it in proper order yourself; we do not have 'service personnel' to do this for us. | |
| − | |||
| − | + | Ask for help if needed. | |
| − | |||
| − | |||
| − | |||
| − | |||
| − | |||
| − | |||
| − | |||
| − | + | Checks: | |
| + | * Is the machine stable | ||
| + | * Is the blade not damaged and properly attached | ||
| + | * Is there sufficient cooling liquid | ||
| + | * Is the working area free of debris | ||
| + | * Is the floor free from obstacles and cutting oil | ||
| − | == | + | =Usage= |
| + | <span style="color: rgb(255, 102, 0);" data-mce-style="color: #ff6600;">''Where does the authorisation come in?''</span> | ||
| − | + | Before anything else: | |
| + | # Make sure you have read, understand and remember the safety instructions | ||
| − | + | To power on the machine: | |
| − | # | + | # Ensure that the on-off switch on the side of the machine is in the horizontal off position. |
| − | # | + | # Ensure that pump switch is set as expect it to be. |
| − | ## | + | # Press the green 'on' button on the wall control box (right most buttons). |
| + | # Red light on the side of the machine should turn on. | ||
| − | + | To use the machine | |
| + | # Use the on-off switch on the side of the machine to switch it on and off. | ||
| − | + | To power off the machine: | |
| + | # Ensure that the on-off switch on the side of the machine is in the the off position | ||
| + | # Press the red 'off' button on the wall control box (to the left of the machine). | ||
| + | # Red light on the side of the machine should turn off. | ||
| − | + | To put the machine into `out of order' mode. | |
| + | # Ensure that all the on-off switches are in the off position. | ||
| + | # Press the red 'off' button on the wall control box. | ||
| + | # Turn the key; setting it it '0'. | ||
| + | # Put the key in one of the safety lock boxes. | ||
| + | # Report the issue to the mailing list forthwith. | ||
| − | + | =Maintenance= | |
| − | + | ==Replenishing or Replacing Cutting fluid== | |
| − | + | [[Bestand:Boorolie.png|100px|right|Boormelk]][[Bestand:Iso150.jpg|100px|right|Olie VG/ISO-150]] | |
| − | | | ||
| − | | | ||
| − | |||
| − | |||
| − | |||
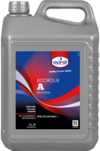
| − | + | The cutting fluid needs to be replaced every 3 months or earlier if it stinks | |
| − | [[ | + | [[SnijOlie BoorOlie Cutting Oil|Boor olie, boormelk / koelvloeistof]] vervagen (4x per jaar; 1:20). |
| − | + | Spare cutting fluid oil is in the blue closet in the metal area | |
| − | + | Supplier cutting fluid: http://www.oliehandel-hvdberg.nl in Leiden (heeft altijd wel voorraad) of HBM. | |
| + | ==Replenishing or Replacing Gear oil== | ||
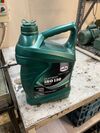
| + | The Gear oil needs to be replanished or replaced every 6 months with VG/ISO-150 oil. | ||
| − | + | The spare gearbox oil is in the blue closet in the metal area | |
| − | + | Supplier gearbox oil: http://www.oliehandel-hvdberg.nl in Leiden (heeft altijd wel voorraad) of HBM. | |
| − | + | ==Replacing Saw Blade== | |
| + | The Saw Blade needs to be replaced when worn or damaged. | ||
| + | * Incidentally when needed. | ||
| + | * Every year a normal inspection | ||
| − | = | + | ====Tools==== |
| + | [[Bestand:Signal-2023-10-24-141826 003.jpg|miniatuur|machinesleutel #37]] | ||
| + | The special wrench No 38 for replacing the blades is located behind the machine on the wall. <br /> | ||
| + | (Moer M27x2 draad, sleutel 38mm, leverancier https://www.porza.nl/product/machinesleutel-38-mm-bgs-34238) | ||
| − | + | The screw thread is left-turning, so to loosen it, turn the nut clockwise. | |
| − | + | After replacing, the nut should be turned quite tight counter-clockwise. | |
| − | + | ====The saw blade itself==== | |
| + | The spare saw blades are in the black closet next to the air compressor. | ||
| − | |||
| − | + | The sizes of the saw-blade: | |
| + | [[Bestand:Zaagblad-2-11-63.png|miniatuur|Zaagblad, 2-11-63 driver; 32 hole, 210 diameter]] | ||
| + | # Diameter < 210mm | ||
| + | # Gaten hart-hart afstand 63mm, gat 11mm pin 10mm, Center gat 32mm | ||
| + | # Industrie naam: Meeneemgat "2/11/63" --vaak verkocht met 2 extra gaten als "2/8/45+2/11/63" | ||
| − | + | ====Cutting speed==== | |
| − | + | Voor ongelegeerd staal is de gewenste snijsnelheid ergens rond de 25-35 meter/minuut. | |
| − | |||
| − | |||
| − | + | De diameter van het blad is 210mm; PI x 21.0 cm = 70cm omtrek. | |
| − | + | Gemeten (ronald) is 40 RPM. Dus 28 meter/minuut draaisnelheid. | |
| + | {| class="wikitable" | ||
| + | |- | ||
| + | ! Tanden | ||
| + | ! Afstand/tand | ||
| + | ! Wand dikte | ||
| + | ! Staf maat | ||
| + | |- | ||
| + | | ~300 | ||
| + | | < 5mm | > 1mm | ||
| + | | > 15mm | ||
| + | |- | ||
| + | | ~200 | ||
| + | | < 9mm | > 3mm | ||
| + | | >> 30mm | ||
| + | |} | ||
| − | + | Besteld October 2023: 2x https://karnasch.tools/en/all-products/sawing/circular-saw-blades/metal-circular-saw-blades/2mm-cut-210mm-210-bw-teeth-51000210020/ -- Voor onder 800N/m2. Nog niet besteld/aanwezig - zaagbladen RVS, Alu/Brons/messing, gietijzer en voor echter staal. | |
| − | + | [[Bestand:Zaagblad-2-11-63.jpg|miniatuur|Zaagblad, 2-11-63 driver; 32 hole, 210 diameter]] | |
| − | |||
| − | + | [[Bestand:Black-metla-cap.jpg|miniatuur]] | |
| + | Vervangende bladen liggen in het zwartje kastje metaalhoek. In `history' hieronder opnemen als je er een nieuwe in zet. | ||
| − | + | =Also Known As= | |
| − | + | Metal Miter Saw, Metal Mitersaw, Metalmitersaw, Metal Mitre Saw, Metalmitresaw, Afkort zaag metaal, Metaalafkortzaag. | |
| − | |||
| − | |||
| − | |||
| − | = History & Maintenance = | + | =History & Maintenance= |
{| class="wikitable" | {| class="wikitable" | ||
|- | |- | ||
| − | ! Date | + | ! Date |
| + | ! Description | ||
|- | |- | ||
| − | | 2023-10-07 | + | | 2023-10-07 |
| + | | [https://www.hbm-machines.com/nl/p/hbm-boor-en-snijolie-waterverdunbaar new cutting fluid; 1:20 water; from HBM] | ||
|- | |- | ||
| − | | 2023-10-20 | + | | 2023-10-20 |
| + | | nieuwe [https://www.porza.nl/product/machinesleutel-38-mm-bgs-34238 machine sleutel (via Amazon)] | ||
|- | |- | ||
| − | | 2023-10-23 | + | | 2023-10-23 |
| + | | [https://karnasch.tools/en/all-products/sawing/circular-saw-blades/metal-circular-saw-blades/2mm-cut-210mm-210-bw-teeth-51000210020/ nieuwe bladen staal] direct bij [https://karnasch.tools/ leverancier]; 3 dagen levertijd. | ||
|- | |- | ||
| − | | 2023-10-24 | + | | 2023-10-24 |
| + | | Passtuk voor achteruitschuiven, draden gefixed, schema gefixed. | ||
|- | |- | ||
| − | | 2023-10-26 | + | | 2023-10-26 |
| + | | Tandwielkast olie, VG/ISO-150 - bijgevuld. | ||
|} | |} | ||
Huidige versie van 2 nov 2024 om 12:52
Inhoud
What is the state
NOT READY -- main todo's
- Safety Scan op Github plaatsen
- Safety Instruction Card
- Usage Instruction Card
- Meggen van de motor ivm andere draden die we niet kunnen zien
- Foto's maken van hoe de kap er af moet - met name fragile plastic deel.
- Kijken waar de trilling vandaan komt en dat vast zetten
- Zorgen dat alle klauwen kunnen draaien -- moet waarschijnlijk gewoon even wat vet op.
- Foto's accesoires op de wiki
- Opbergplek bedenken voor de geleide rails en het handle
- Autorisatie procedure uitwerken
- Medium Prio - Elektrische schema's in de Wiki
- Medium Prio - Locatie herbezien ivm dat metaal kan uitsteken
- Lage prio - Verplaatsen noodstop
- Lage prio - De klamp rood verven
- Lage prio - Pictogram voor niet met de hand vasthouden
What is it?
The Metal Mitre Saw is a mitre saw for metal.
It differs from many other saws in that it has a slow-turning saw-blade and a cooling mechanism, allowing to cut metal without getting it hot.
The results are that you can have very streight and smooth cutting edges.
The Metal Mitre Saw is located in the Welding area.
Safety instructions
This equipment is safety category 2:
- Mandatory instructions.
- [liability waiver] on file.
- Approval from trustees, but ok to operate alone
- (but be careful/ensure you have assistance when handling very large things).
This equipment is Noise Category 2:
Can be used at all hours, but in moderation.
Be considerate; if you feel you need to wear ear protection,
then only use the tool between 07:00 and 19:00.
Dust classification: NO
Fire classification: NO
Gas Bottle: NO
You need a proper instruction for using this machine properly.
General pointers
Pay special attention to:
- Getting caught by moving parts
- Getting cut by sharp edges
- Getting cut by flying splinters when something breaks
- Falling when the floor gets slippery from cutting fluid
- Damaging the machine when the object is not properly fixed and balanced
- Only cut workpieces of appropriate materials (only un-hardened metal <800N/m)
- Only cut workpieces of appropriate sizes (no sheet metal)
- If your workpiece is of significant size or weight, balance it properly
Before using it
Check whether the machine is in proper order before using it.
If it is not, report such in the participants mailing list.
Make it in proper order yourself; we do not have 'service personnel' to do this for us.
Ask for help if needed.
Checks:
- Is the machine stable
- Is the blade not damaged and properly attached
- Is there sufficient cooling liquid
- Is the working area free of debris
- Is the floor free from obstacles and cutting oil
- Is there sufficient light to see what you are doing
While using it
- Do not wear gloves, because they can pull your hands into the machine. And once your hands are caught by the machine, it is difficult to turn it off
- Do not wear clothes or jewels that can get caught - including rings
- Do wear safety classes for protection of splinters when something breaks
- Make sure you know where the safety buttons are
- Fix the workpiece with the clamp
- Do not hold the workpiece with your hands while cutting
- Do not put force on the handle while cutting
- Keep checking whether the workpiece is properly fixed
- Keep checking that no cutting fluid is spilled because the floor can become slippery
After using it
Check whether the machine is in proper order after using it.
If it is not, make it in proper order yourself; we do not have 'service personnel' to do this for us.
Ask for help if needed.
Checks:
- Is the machine stable
- Is the blade not damaged and properly attached
- Is there sufficient cooling liquid
- Is the working area free of debris
- Is the floor free from obstacles and cutting oil
Usage
Where does the authorisation come in?
Before anything else:
- Make sure you have read, understand and remember the safety instructions
To power on the machine:
- Ensure that the on-off switch on the side of the machine is in the horizontal off position.
- Ensure that pump switch is set as expect it to be.
- Press the green 'on' button on the wall control box (right most buttons).
- Red light on the side of the machine should turn on.
To use the machine
- Use the on-off switch on the side of the machine to switch it on and off.
To power off the machine:
- Ensure that the on-off switch on the side of the machine is in the the off position
- Press the red 'off' button on the wall control box (to the left of the machine).
- Red light on the side of the machine should turn off.
To put the machine into `out of order' mode.
- Ensure that all the on-off switches are in the off position.
- Press the red 'off' button on the wall control box.
- Turn the key; setting it it '0'.
- Put the key in one of the safety lock boxes.
- Report the issue to the mailing list forthwith.
Maintenance
Replenishing or Replacing Cutting fluid
The cutting fluid needs to be replaced every 3 months or earlier if it stinks
Boor olie, boormelk / koelvloeistof vervagen (4x per jaar; 1:20).
Spare cutting fluid oil is in the blue closet in the metal area
Supplier cutting fluid: http://www.oliehandel-hvdberg.nl in Leiden (heeft altijd wel voorraad) of HBM.
Replenishing or Replacing Gear oil
The Gear oil needs to be replanished or replaced every 6 months with VG/ISO-150 oil.
The spare gearbox oil is in the blue closet in the metal area
Supplier gearbox oil: http://www.oliehandel-hvdberg.nl in Leiden (heeft altijd wel voorraad) of HBM.
Replacing Saw Blade
The Saw Blade needs to be replaced when worn or damaged.
- Incidentally when needed.
- Every year a normal inspection
Tools
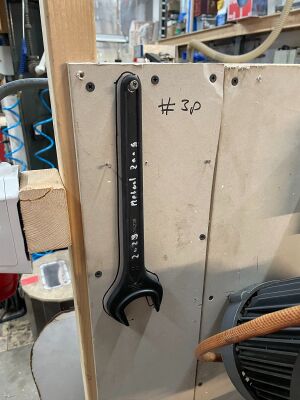
The special wrench No 38 for replacing the blades is located behind the machine on the wall.
(Moer M27x2 draad, sleutel 38mm, leverancier https://www.porza.nl/product/machinesleutel-38-mm-bgs-34238)
The screw thread is left-turning, so to loosen it, turn the nut clockwise.
After replacing, the nut should be turned quite tight counter-clockwise.
The saw blade itself
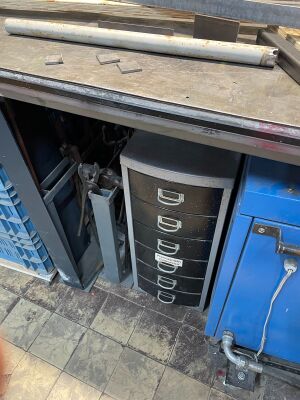
The spare saw blades are in the black closet next to the air compressor.
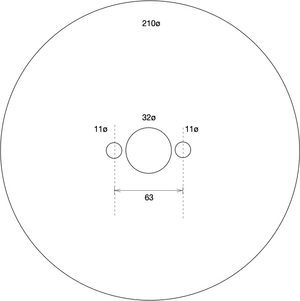
The sizes of the saw-blade:
- Diameter < 210mm
- Gaten hart-hart afstand 63mm, gat 11mm pin 10mm, Center gat 32mm
- Industrie naam: Meeneemgat "2/11/63" --vaak verkocht met 2 extra gaten als "2/8/45+2/11/63"
Cutting speed
Voor ongelegeerd staal is de gewenste snijsnelheid ergens rond de 25-35 meter/minuut.
De diameter van het blad is 210mm; PI x 21.0 cm = 70cm omtrek.
Gemeten (ronald) is 40 RPM. Dus 28 meter/minuut draaisnelheid.
| Tanden | Afstand/tand | Wand dikte | Staf maat |
|---|---|---|---|
| ~300 | > 1mm | > 15mm | |
| ~200 | > 3mm | >> 30mm |
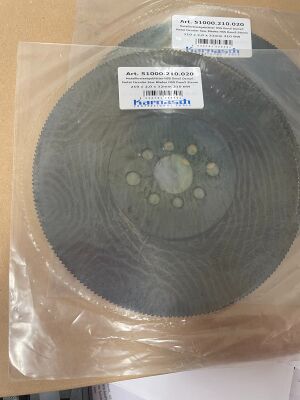
Besteld October 2023: 2x https://karnasch.tools/en/all-products/sawing/circular-saw-blades/metal-circular-saw-blades/2mm-cut-210mm-210-bw-teeth-51000210020/ -- Voor onder 800N/m2. Nog niet besteld/aanwezig - zaagbladen RVS, Alu/Brons/messing, gietijzer en voor echter staal.
Vervangende bladen liggen in het zwartje kastje metaalhoek. In `history' hieronder opnemen als je er een nieuwe in zet.
Also Known As
Metal Miter Saw, Metal Mitersaw, Metalmitersaw, Metal Mitre Saw, Metalmitresaw, Afkort zaag metaal, Metaalafkortzaag.
History & Maintenance
| Date | Description |
|---|---|
| 2023-10-07 | new cutting fluid; 1:20 water; from HBM |
| 2023-10-20 | nieuwe machine sleutel (via Amazon) |
| 2023-10-23 | nieuwe bladen staal direct bij leverancier; 3 dagen levertijd. |
| 2023-10-24 | Passtuk voor achteruitschuiven, draden gefixed, schema gefixed. |
| 2023-10-26 | Tandwielkast olie, VG/ISO-150 - bijgevuld. |
