Arboga GM 2508 Geared Head Drill Press Pillar Drill: verschil tussen versies

Uit MakerSpace Leiden
Ga naar: navigatie, zoeken
Regel 1: Regel 1:
 
[[Category:Tool]][[Category:Metal]][[Category:SafetySheet]]
 
[[Category:Tool]][[Category:Metal]][[Category:SafetySheet]]
 +
{{SafetyCat3}}{{NoiseCat2}}[[Category:Wood]]
  
See github for documentation. [https://github.com/MakerSpaceLeiden/AbeneMill/]


Regel 10: Regel 10:
  
 
=Status=
 
=Status=
Operational - maar instructie check-list en andere zaken nog niet helemaal klaar. Hulp zeer welkom. Probeer het voorlopig bij HansD, Henry, Alex or Dirk-Willem (TBD).
+
Operational.
  
 
=Classification=
 
=Classification=
  
* '''Gevaarlijke machine''' - inleveren van de ''[https://github.com/MakerSpaceLeiden/Manuals/blob/master/Verklaring-gevaarlijke-apparatuur.txt bekend met risico's gevaarlijke apparaten formulier]'' bij bestuur verplicht.
+
* Veiligheidscategorie 3, instructie verplicht
* Instructie & OK bestuur verplicht
+
* geluidscategorie 2, kan 24/7 gebruikt worden. Houdt rekening met de buren.
* Mag op alle uren gebruikt worden; hou wel rekening met de buren.
+
* Instructie is verplicht; registratie in het CRM.
* Aanwezigheid tweede persoon aanbevolen maar niet verplicht.
 
  
{{SafetyCat2}}This equipment is safety category 2:
+
* This equipment is safety category 3, Mandatory instructions.
* Mandatory instructions.
+
* Noise category 2, can be used 24/7. Be considerate of the neighbours.  
* ''[liability waiver]'' on file.
 
* Approval from trustees, but ok to operate alone
 
: (but be careful/ensure you have assistance when handling very large things).<br  />With respect to noise - be kind and considerate after 19:00 - and limit yourself to sporadic low-noise use.
 
{{NoiseCat2}}
 
{{Sjabloon:Imperial}}


= Maatregelen =  
 
= Maatregelen =  


* Gebruik van handschoenen verboden
 
* Gebruik van handschoenen verboden
Regel 35: Regel 27:
 
* Gebruik van een (veiligheids)bril is verplicht.
 
* Gebruik van een (veiligheids)bril is verplicht.
 
* Zorg dat je weet waar de noodstoppen zitten.
 
* Zorg dat je weet waar de noodstoppen zitten.
* Kijk of je een van de magnetische schermen kan gebruiken.
+


=Belangrijkste veiligheidsaandachtspunten=
 
=Belangrijkste veiligheidsaandachtspunten=
 
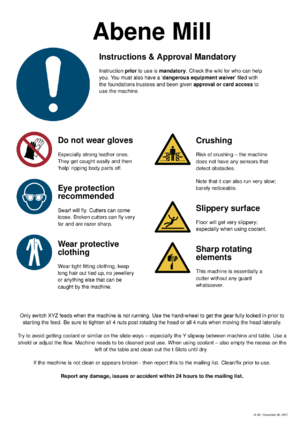
[[File:abene-safetysheet.png|right|300px|Abene Safety Sheet]]
 
[[File:abene-safetysheet.png|right|300px|Abene Safety Sheet]]
  
* Gegrepen worden door de draaiende delen.
+
* Risico’s bij gebruik zijn
* Bewegingen van de assen, beknelling.
+
* Gegrepen worden door boorkop
* Scherpe snel draaiende messen
+
* Boren in dun plaatmateriaal met grote boordiameters
* Scherpe spaanders, rondspattende spaanders en vonken.
+
* Rondvliegende spanen
* Rondspatten afgeproken onderdelen (tanden frees, afgebroken as).
+
* Losschieten werkstuk
* Tijdens verplaatsen XYZ tafel - botsingen met de draaiende frees/zaag of opbouw van extreme elastische spanning en breuk.
+
* Snijden aan spanen tijdens opruimen
* De vloer kan erg glad worden als je de koelvloeistof gebruikt.


===Behoud van de machine===
 
Deze machines zijn erg gevoelig voor (scherp/hard) slijpsel van de slijpstenen, diamantschijven en electritsch lassen.


Dek daarom de machine _ALTIJD_ af met de blauwe stofkap. En veeg voor gebruik de banen even schoon / hou ze goed in de olie.


NB: the stofkap is zoek. DW/Ardy maken een nieuwe (Q4/2020)
 
  
=Digital Read Out (DRO)=
 
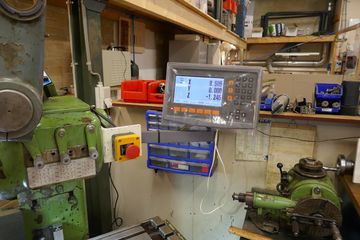
This machine has a [[DRO maten en manual|DRO. Zie deze link voor de manual]]


=Aandachtspunten gebruik=
 
=Aandachtspunten gebruik=
  
* De Arboga kolomboormachine is een tandwielaangedreven boormachine met een boorcapaciteit van 30 mm in massief staal. Het toerental kan door middel van twee mechanische hevels en een elektrische schakelaar variëren van 100 tot 2900 toren.
+
* De Arboga kolomboormachine is een tandwielaangedreven boormachine met een boorcapaciteit van 30 mm in massief staal. Het toerental kan door middel van twee mechanische hevels en een elektrische schakelaar variëren van 100 tot 2900 toeren.
 
+
* De twee mechanische schakelhevels die de mechanische toerental wisseling regelen hebben een duidelijke klik in de uiterste stand. Als de schakelhevels niet vanzelf in de uiterste stand belanden dan moet de boorkop met de hand iets gedraaid worden totdat een duidelijke klik gehoord wordt. * De schakeling met de mechanische scakelhevels moet ALTIJD (!!) In stilstand gebeuren.
 
 
De twee mechanische schakelhevels die de mechanische toerental wisseling regelen hebben een duidelijke klik in de uiterste stand. Als de schakelhevels niet vanzelf in de uiterste stand belanden dan moet de boorkop met de hand iets gedraaid worden totdat een duidelijke klik gehoord wordt. De schakeling met de mechanische scakelhevels moet ALTIJD (!!) In stilstand gebeuren.


Zowel de boortafel als de boorkop kunnen in hoogte worden versteld. In vrijwel alle gevallen valt het verstellen van de boortafel te prefereren. Door de boortafel te zwenken en te verdraaien is een groot aantal posities van het werkstuk in geborgde positie bereikbaar.


Het verdient de hoogste aanbeveling om het werkstuk te klemmen in een daarvoor bestemde boorklem, of bij grotere werkstukken, met een passende lijmtang. Het komt niet alleen de zuiverheid van het te boren gat ten goede maar bovenal is het veel veiliger. Mocht om welke reden dan ook het werkstuk losraken van de klemming en rond de boor gaan draaien probeer het dan NOOIT (!!) met de hand te stoppen. Druk op de noodschakelaar en doe een stap achteruit.


De boorkop heeft conische vatting MC3 met een capaciteit voor boren vanaf 2 tot 16 mm en is zelfklemmend. De boorkop kan eenvoudig gewisseld worden door de draaibare lip tussen boorkop en boorkolom te verdraaien. Daarna kunnen spiraalboren met een MC3 conus direct in de boormachine worden geplaatst. Ook kan een tapkop of grote vezinkboor (beide niet aanwezig) direct op de MC3 conus worden aangesloten.


Gebruik van de kolomboor is uitsluitend toegestaan na een korte algemene instructie!


<span style="font-size: 26.32px;" data-mce-style="font-size: 26.32px;">Gereedschappen</span><br  />
 
Zie [[http://uhv.cheme.cmu.edu/procedures/machining/ch8.pdf deze introductie]] voor gebruik en nomenclatuur.


[[File:abene-tools.jpg|right|280px|Tools Abene Mill]]


Er zijn een aantal gereedschappen die bij de Abene horen. Deze hangen op het bord erachter. Zorg dat ze niet wegraken - een aantal is erg lastig/duur te vervangen. Van links naar rechts:
 
  
# T scrapers - gebruikt om de gootjes schoon te houden. Nieuwe kunnen geprint worden via [[https://www.thingiverse.com/thing:1784353|Abene scraper op Thingiverse]] of [[https://www.thingiverse.com/thing:2733328 Deze parametrische]] Volgende versie zou iets dikker en groter mogen.
 
# Hendel - voor de bankschroef.
 
# Sleutel - voor de moeren die de kop van de machine vastzetten (4 stuks bovenop de schuine baan, 4 stuks rond de draaikop). Deze altijd goed vastzetten voor gebruik.
 
# 3x Sleutel voor de snel-wissel [[Autolock Collet]] Small, Medium en Large. (Zelfzaam. Niet kwijtmaken of lenen).
 
# Sleutel 24 voor het verplaatsen van de bankschroef en andere T slot bouten.
 
# Plastik hamer. Gebruik *NOOIT* een metalen hamer (gereedschapmmetaal op metaal kan spatten).
 
# Kwast om spaanders weg te vegen.
 
# Zaagjes. Een aatal hiervan zijn geschikt voor tandwielen. Er liggen kleinere in de laatjes links.
 
# Sleutel 19/24 voor de tapers, verdeelplaat instelling en de moer aan het eind van de arbors.
 
## Let op - deze is aan het 19 end platter geslepen. '''Dit MOET omdat je anders de DIN2080 uiteinden stuk zou maken.'''
 
# Sleutel 13 voor de eindstoppers.
 
# Sleutel 14 voor de drawbar van de iso40 taper (bovenop het apparaat).
 
# Nog een T-scraper
 
# Snelwissel houdertjes voor de [[Autolock Collet]] in 6 (2x), 10, 12 en 16(2x) mm (S-Type)
 
# 2x iso40 opsteekfreesdoorn  (taper) met  [[Autolock Collet]] Small
 
# Snelwissel houdertjes voor de [[Autolock Collet]] in 20mm, 25mm en 32mm (L-Type).
 
# 4x iso40 opsteekfreesdoorn  (taper) met  [[Autolock Collet]] Large
 
# Vetspuit
 
# opsteekfreesdoorn / taper houder voor in de werkbank om de collet goed te kunnen losmaken zonder beschadiging
 
# 1x iso40 snelspanboorkop (TIR likely around 0.1mm)
 
# 1x iso40 snelspanboorkop onbekend
 
# potje Boorolie, 1L knijpfles boormelk (zie ook [[SnijOlie BoorOlie CuttingOil|SnijOlie BoorOlie of CuttingOil]]).
 
# Korte M22 arbor houder  Met een langsspiebaan (''drive key for milling tools with longitudinal groove'') en zonder dwarsspiebaan op de M22. Bout M8. (Er is wel een M16 'combi' head - dat zowel een spie in de as heeft als blokjes haaks op de as.)
 
# [[ER-Sleutels|ER-Sleutels - sizes ER-25, ER-32 and ER-40]]
 
# [[ER 25/32/40 Collets and holders]]
 
## 3x ISO 40 holder ER40 - met collets/spanklauwen maten
 
## 2x ISO 40 holder ER32 - met collets/spanklauwen maten
 
## 1x ISO 40 holder ER25 - met collets/spanklauwen maten
 
# Korte [[Combi Shell Mill Holder DIN40-16MM|M16 arbor houder  Met een langsspiebaan (''drive key for milling tools with longitudinal groove'') en MET dwarsspiebaan/axial key op de M22. Bout M8]]
 
# 3x ISO 40 holder naar 8mm, 10mm, 12mm rond (hex imbus) DIN69871  vooor Weldonhouder DIN 1835-B - rond freesje met plat stukje.
 
# Ongeveer 8 maal ``Anzugsbolzen DIN 2080 M16 SK40'' om de SK40 in een ISO40 te maken; geschikt voor OTT/onze M16 `drawbar'.
 
# 4 maal lange freesdoorn (zie [[Horizontal Milling Arbor]]) voor horizontaal gebruik met de grijze steun. Allen langsspiebaan/longitudinal groove. En in de maten:
 
## 17 mm
 
## 22 mm
 
## 27 mm
 
## 32 mm
 
## They all use the same support (we have two of such sleeve bearings) that fit in the bronze bushing of the gray arm. Be sure to always Lubricate !
 
# [[MT2]] houder
 
  
In de kast:
+
* Zowel de boortafel als de boorkop kunnen in hoogte worden versteld. In vrijwel alle gevallen valt het verstellen van de boortafel te prefereren. Door de boortafel te zwenken en te verdraaien is een groot aantal posities van het werkstuk in geborgde positie bereikbaar.
  
# Grote M22 arbor - voor horizontaal gebruik. Met een langsspiebaan (''drive key for milling tools with longitudinal groove'') en zonder dwarsspiebaan op de M22. Bout M8.
 
# [[Verdeelapparaat]] om tandwielen te maken (1/36 stappen en alle veelvouden van 1/1600). (Dividing/Indexing)
 
Dividing/Indexing Attachment for SB9
 
# Vrij-draaiend center for the verdeelplaat.
 
# Divers opspanspul
 
  
'''Let op als je iets besteld:''' 1) We hebben geen M22 taper/opsteekfreesdoorn met dwarsspiebaan (onze opsteekfreesdoorn zijn geen combi types). Dus zorgen dat het een spie hapje heeft - of er ook een (combi)opsteekfreesdoorn met dwarsspiebaan bij bestellen. En 2) de collets zijn het '''type met draad''' op het eind en in de schacht maten 6, 10, 12 en 16mm.
+
* Het verdient de hoogste aanbeveling om het werkstuk te klemmen in een daarvoor bestemde boorklem, of bij grotere werkstukken, met een passende lijmtang. Het komt niet alleen de zuiverheid van het te boren gat ten goede maar bovenal is het veel veiliger. Mocht om welke reden dan ook het werkstuk losraken van de klemming en rond de boor gaan draaien probeer het dan NOOIT (!!) met de hand te stoppen. Druk op de noodschakelaar en doe een stap achteruit.
  
We hebben wel een aantal '''gladde collets''' in ER24,ER32, etc - maar lang niet alle maten. Dus check wat er is en/of stel voor een ER32 set te kopen als je dit nodig hebt
 
  
 +
* De boorkop heeft conische vatting MC3 met een capaciteit voor boren vanaf 2 tot 16 mm en is zelfklemmend. De boorkop kan eenvoudig gewisseld worden door de draaibare lip tussen boorkop en boorkolom te verdraaien. Daarna kunnen spiraalboren met een MC3 conus direct in de boormachine worden geplaatst. Ook kan een tapkop of grote vezinkboor (beide niet aanwezig) direct op de MC3 conus worden aangesloten.
  
===Aandachtspunt collet===
 
'''Collet alleen voor juiste maat:''' Het type [[Autolock Collet]] dat we hebben accepteert alleen de bijbehorende 6, 10, 12, 16, 25, 40mm maten (met schroefdraad; 22mm mist).
 
  
Stop er dus niet iets in van 0.5 mm dikker of dunner - dan draai je subiet de collect stuk (hij breekt - zie de gele doos van de fly-cutter/boring bar voor een voorbeeld). En nieuwe collects zijn duur.
+
* Gebruik van de kolomboor is uitsluitend toegestaan na een korte algemene instructie!
  
Zie [[Autolock Collet]] voor instructies het aandraaien/gebruik.


===Nog niet uitgezocht===
 
  
# 4x [[Autolock Collet|Clarkson]] holder groot
 
## 8x 40 (streep - metric)
 
## 6x 25 (streep - metric)
 
## 4x 1" (geen streep - zijn '''imperial''' -- PAS OP!)
 
# 1x ISO 40 holder - MT/MC ? flink groter dan 2 in elk geval.
 
  
==Eigenschappen==
 
De opsteekfreesdoorn (taper) is een ISO-40 met twee uitsparingen (vgl. NT40, MT40, 40-Int) voor de dwarsspiebaan op de machine zelf.
 
  
We hebben één snelwissel cotllet met 5 inserts  ''met draad'' in de maten: 16mm, 12mm, 10mm en 2x 6mm (zowel doorsnee als M-draad aan einde frees).
 
  
[[T-slot and scraper|De T-slots zijn 18mm breed.  De blokjes zijn 17.5 breed (boven), 25mm onder, 18mm hoog; met een randje van 9mm hoog onderop en 11mm op het 'smalle' deel.]] Ze zitten vast met M16 bouten( (sleutel 24).  Zie [[Opspanset / T-Slot Clamping Kit]].
 
  
De arbors (vertikaal-kort en horziontaal lang) zijn 22m/arbor met key (drive key for milling tools with longitudinal groove).
 
 
We hebben op dit moment '''geen''' ISO-40 taper met 22mm rond/arbor en twee blokjes (drive ring for milling tools with transversal groove).


=Operating the machine=
 
=Operating the machine=
 
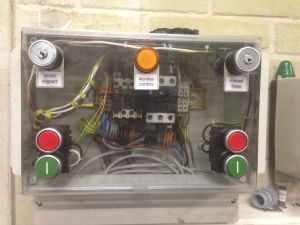
[[Bestand:grinder-safety-relay.jpg|right|300px|Safetysheet relay Abene]]
 
[[Bestand:grinder-safety-relay.jpg|right|300px|Safetysheet relay Abene]]
  
The machine has a safety relay. This stops the machines from starting unattended.
+
The machine has a safety relay (on the pillar behind the machine). This stops the machines from starting unattended.
  
 
To power on the machine:
 
To power on the machine:
  
# Ensure that the round on-off switch on machine (bottom of the pedestal on the side, below the orange light) is in the vertical off position.
+
# Ensure that the black on-off switch on the machine (on the leftside of the head) is in the vertical -middle- off position.
# Ensure that pump switch (bottom of the pedestal on the side, below the orange light) is in the vertical off position.
+
# ensure that the key switch on the safety relay is in the "I" position.
# Ensure that the feed and mill buttons are in the vertical off position (top of the pedestal).
+
# Press the green 'on' button on the safety relay.
# Identify yourself by holding your ID card (tag) against the front side of the NodeMetal box, which is placed on the wall below the wall control box.[[Bestand:MetalNode box.jpg|right|middle|thumb|MetalNode box]]
+
 
# Press the green 'on' button on the wall control box (to the left of the machine; right most buttons).
+
# Use the black on-off switch on the machine to switch it in eithwer the "I" or "II" postion.
# The blue light on the wall should come on. If not - check that the switch on the current limited (small box next to the control box)  is in the ON setting.
+
# The machine will start drilling..  
# Use the on-off switch on machine (bottom of the pedestal, below the orange light) to switch it on.
 
# The orange light on the machine should come on.  


To power off the machine:
 
To power off the machine:
  
# Ensure that all the on-off switches on the machine the off position (all 4 of them).
+
# Ensure that the black on-off switches on the machine is in the vertical -middle- off position.
# Press the red 'off' button on the wall control box (to the left of the machine).
+
# Press the red 'off' button on the safety relay.
  
 
To put the machine into `out of order' mode.
 
To put the machine into `out of order' mode.
  
# Ensure that all the on-off switches on the machine the off position (all 4 of them).
+
# Ensure that the black on-off switches on the machine is in the vertical -middle- off position.
 
# Press the red 'off' button on the wall control box.
 
# Press the red 'off' button on the wall control box.
# Take the key which is inside the control box and use that to operate the keylock of the grinder; setting it it '0'.
+
# Set the key switch on the safety relay in the "0" position and remove the key.
 
# If you are very concerned about someone re-enabling it - then hand the key to one of the trustees or put it in the mailbox of a trusteed (the one where you sent the ''[[https://makerspaceleiden.nl/crm/waiverform/  liability waiver]]''  to).
 
# If you are very concerned about someone re-enabling it - then hand the key to one of the trustees or put it in the mailbox of a trusteed (the one where you sent the ''[[https://makerspaceleiden.nl/crm/waiverform/  liability waiver]]''  to).
# '''Report the issue to the mailing list.
+
# Put a note on the machine stating that it is "Out of Order" with your name and date on it.
'''
+
# '''Report the issue to the mailing list.'''
 
 
==Controls==
 
[[Bestand:abene-lower-left-hand-side.png|300px|right|Abene - Lower left hand side Main controls]]


The main controls are on the lower right hand side. 


Note that the feed reduction gearbox may require you to operate the cardanic/telescopic shaft by hand a bit to make it 'click'.


[[Bestand:abene-top-left-hand-side.png|300px|right|Abene - Top left hand side Operator controls]]


The operator controls are on top of the control pedestal. The main mill switch will cause the mill to operate clockwise (e.g. as needed for a normal drill ) when turned left (i.e. in the observable direction of the head when it is in the down position). Turning it clockwise causes the mill to rotate clockwise (again - when seen from the 'front').


You need to give it an extra push-turn to cause the relay to activate; and then let go.


The bottom switch will start the automatic feed (assuming one of the feed levers is engaged).


Pressing the fast feed button will move the table fast. Be very careful with this - the feed is strong and a head crash will break your drill/bit (or worse; e.g. damage the collet or you -- neither of which is cheap or easily replaced).


==Feed rates==
 
The dial with the handle on the cardanic axle controls the feed rate. The Z axis is (always) twice as slow as the X and the Y. So this is the reason why the ring with numbers as pairs of values.


The high numbers map to the X/Y speed: 16 to 750 mm/minuut.


The low number below it maps to the Z axis: 8-375 mm/minuut.


The possible values
 
[[https://github.com/MakerSpaceLeiden/AbeneMill/blob/master/documentation/scans-from-red-binder-france/Abenefeedspeeds.jpg are in this table]]


==Speed calculation==
 
A typical speed example would be a HSS mill, 12mm -> 25 meter/minute speed == 25000 mm / ( D x PI ) = 25000/12/3.14 = 650 RPM.


The typical chip load is around 0.065 mm per tooth. So 650 x 0.065 = 45 rpm with one tooth, 86 RPM with two, 130 with three and 160 with four.


=Bekende problemen=
 
Problemen die we (nog) niet opgelost hebben.


===koel/boorvloestof loopt niet===
 
Er is mogelijk een probleem met de boormelk (overleg gaande met leverancier). Indien het na 20-30 seconden niet gaat lopen; met de perslucht blazer 10-20 seconden doorblazen vanaf de nozzle bij de kop (dus in tegengestelde richting). Dan 20-30 seconden de kans geven om te gaan lopen. Herhaal indien nodig. Het neusje even laag houden helpt ook.


Onze boormelk was verlopen of is te koud geworden -- er is nieuwe. Die moet nog gemengd worden (2018-1-18)


===Versnellings bak feedsnelheid pakt niet===
 
Disengage alle XYZ. Draai het handeltje langzaam een beetje naar links en naar rechts terwijl je met de hand de kardan as wat draait.


===De voeding voor de lamp is een rommeltje===
 
De voelding ligt nu los onder in de machine. Verre van ideaal. Moet bedacht worden hoe we dit beter kunnen doen.


===Z as gaat soms vanzelf lopen als je de Y schakelt bij stille X.===
 
<del>Onduidelijk waarom - maar soms gaat de Z as spontaan 'engaged' en zakken tijdens het schakelen van de Y -- mogelijk in combinatie (alleen ) met een ontkoppelde X.</del> Alex heeft dit waarschijnlijk opgelost (March 2018)


=To procure/find=
 
  
# <del>Light </del> -- but now we need a longer/stronger flexible arm.
 
  
Goede bron: https://www.singer-werkzeugmaschinen.de/ - goedkoop en er betrouwbaar gebleken.
+
==Drilling Speed Table==
 +
Depending on material, hole diameter and thickness of the matterial there is an advised drilling speed. A table will be mounted on the pillar behinmd the machine.
  
=To make/find/buy or 'do'=
 
  
# Plank ophangen.
 
# Beter horziontaal zetten - moet mogelijks links voor nog iets extras onder de voet (Hans heeft een perfecte tandenstoker hiervoor).
 
# Goede inventory maken van de frezen en boren. Verstoppen van de rare maten die de collets stuk maken bij gebruik.
 
# Voeding lampje vastmaken. Ligt nu los.
 
# https://sheffieldtooling.co.uk/product-category/toolholding/rotating-toolholding/collets/
 
  
=Lubrication History=
+
=Nog te doen=
Details on github: [https://github.com/MakerSpaceLeiden/AbeneMill/tree/master/lubrication]
+
* achterwand maken en plaatsen
 +
* werktafel en kolomboor 10 cm. naar links verplaatsen
  
The actual advice from Abene (late 2017) is much simpler:
 
  
# Q8 Goya NT68 (gear oil) spindle and feed gear box)
 
# For everything else, Q8 Wagner NT68 (Slideway lube)
 
  
== Current situation ==
 
  
# Main drive gearbox, spindle gearbox, drive gearbox on the left.
+
* toevoer spanningskabel verlengen en afbeugelen
## Replaced with Hykrol HLP ISO-VG 100 (ISO 100 hydraulic oil), 2017-11-19. 5L was about sufficient all 3 gearboxes.
+
* EenChore aanmaken in het CRM-systeem voor onderhoud
# Overarm bearing
 
## Emptied and cleaned  2017-11-19. Not yet replaced.
 
# Sideways
 
## Emptied and cleaned 2017-11-12. Replaced by sideway oil 68 - 2017-12-15.
 
# Kneejacking screw
 
## Emptied and cleaned 2017-11-29. Replaced by ISO 46 hydraulic oi.l 2017-11-29.
 
# Headstock and motor bearings.
 
## Emptied and cleaned. 2017-11-29. Replaced by ISO 100 hydraulic oil. 2017-11-29.
 
# Coolant
 
## Emptied and cleaned - not able to reach all parts. Replaced by 1:10 mix. 2017-12-15. Zie"http://www.oliehandel.nl/eurol/eurol-boorolie-a" voor details.
 
  
Nog te doen:
+
== Onderhoud ==
  
# Diverse lagers kunnen een dot dik vet gebruiken (achter de ronde luikjes).
+
1 maal per kwartaal:
# De blauwe kap is weg.
+
* Optische inspectie machine.
 +
* Controle of de machine nog waterpas staat.
 +
* Eventueel smeren als nodig.
  
=Disassembly Notes=
 
  
# When removing the X table - either remove the spindle first -or- make sure that when you put the X table on a cart you use blocks to not bend the then very exposed spindle.
 
# When removing the gearbox in the knee it is *crucial* to first remove the guiding pin. This allows you to rotate the unit some 10 degrees clockwise to lift the crownwheel. You *will* break a teeth from the crownwheel otherwise !
 
# The X axis nut is mounted with a '''left handed thread.''' It is shorter than the old one - as the [https://www.trapeziumdraad.nl Machinefabriek Hardwerwijk] only had 50mm ones. So there is a metal 'extension' nut made by Alex to lengthen it.
 
[[Bestand:Abene-lh-nut-1.jpg|250px|Left handed nut abene]]


[[Bestand:Abene-lh-nut-2.jpg|106px|Left handed nut abene]]
 
  
==DRO==
 
 
# The X scale is easiest aligned with the [[Voelermaat-Feeler gauge|Feeler gauge]];
 
## loosen al the bolts; use the 1mm [[Voelermaat-Feeler gauge|feeler]] to get the height right;
 
## then use the 0.5 mm [[Voelermaat-Feeler gauge|feeler]] to make the 'thick bits at either end stick out 0.5 from the aluminium scale. And the middle bit should be exactly flush with the scale.


=Electrics=
 
=Electrics=
 
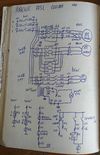
[[Bestand:schema-abene-2017.jpg|right|100px|Schematic Abene]]
 
[[Bestand:schema-abene-2017.jpg|right|100px|Schematic Abene]]
  
Aart has a tentative schematic of the machine. It has its own safety relays.
 
  
The emergency stop is wired into the overheating sensor of the main engine; and interrupts power to the main power relay.
+
The emergency stop is wired into the safety relay.
  
The machine has a N (blue) feed - it is not used. The extra light has been connected to the 110V transformer.
+
The machine has a N (blue) feed which is not used.
  
The fast feed works by reversing the direction of the feed motor. It then mechanically bypasses the reduction gear and directly drives the telescopic/card feed shaft.
 
  
==Junction box on the wall==
+
==Safety Relay==
 
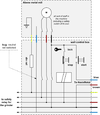
[[Bestand:safety-schema-abene-2018.png|right|100px|Schematic safety switch Abene]]
 
[[Bestand:safety-schema-abene-2018.png|right|100px|Schematic safety switch Abene]]
The wall junction box contains a normal start/stop safety relay. It is flanked by a power/current limiter which is set to a fairly conservative value (inside the box with the blue light on it).
+
The safety relay is a box containing a normal start/stop safety relay. It is flanked by a power/current limiter which is set to a fairly conservative value.
 
 
The situation around the start-button & Neutral is not ideal. Main reason is that we could not fit the normal NO/NC companion contacts on top of the power relay due to not having enough height. This is deemed acceptable as the Abene has its own full complement of safety relays on the 3 phases, the Neutral is not used and what not.
 

Versie van 14 nov 2022 om 22:13

This equipment is safety category 3:

  • Mandatory, in person, instructions.
  • Make sure you read the Wiki before asking.

This equipment is Noise Category 2:
Can be used at all hours, but in moderation.
Be considerate; if you feel you need to wear ear protection,
then only use the tool between 07:00 and 19:00.


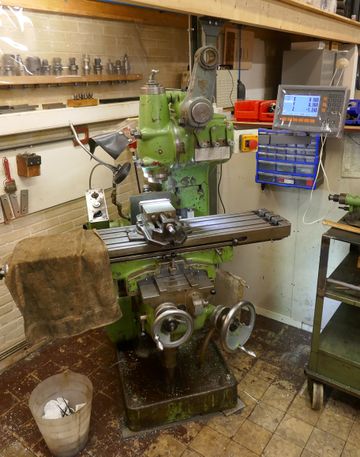
Abene Mill

[1]


Abene Mill DRO

Status

Operational.

Classification

  • Veiligheidscategorie 3, instructie verplicht
  • geluidscategorie 2, kan 24/7 gebruikt worden. Houdt rekening met de buren.
  • Instructie is verplicht; registratie in het CRM.
  • This equipment is safety category 3, Mandatory instructions.
  • Noise category 2, can be used 24/7. Be considerate of the neighbours.

Maatregelen

  • Gebruik van handschoenen verboden
  • Geen loshangende haren, sieraden, kleding, ringen, armbanden, touwtjes hoodie.
  • Gebruik van een (veiligheids)bril is verplicht.
  • Zorg dat je weet waar de noodstoppen zitten.


Belangrijkste veiligheidsaandachtspunten

Abene Safety Sheet
  • Risico’s bij gebruik zijn
  • Gegrepen worden door boorkop
  • Boren in dun plaatmateriaal met grote boordiameters
  • Rondvliegende spanen
  • Losschieten werkstuk
  • Snijden aan spanen tijdens opruimen


Aandachtspunten gebruik

  • De Arboga kolomboormachine is een tandwielaangedreven boormachine met een boorcapaciteit van 30 mm in massief staal. Het toerental kan door middel van twee mechanische hevels en een elektrische schakelaar variëren van 100 tot 2900 toeren.
  • De twee mechanische schakelhevels die de mechanische toerental wisseling regelen hebben een duidelijke klik in de uiterste stand. Als de schakelhevels niet vanzelf in de uiterste stand belanden dan moet de boorkop met de hand iets gedraaid worden totdat een duidelijke klik gehoord wordt. * De schakeling met de mechanische scakelhevels moet ALTIJD (!!) In stilstand gebeuren.


  • Zowel de boortafel als de boorkop kunnen in hoogte worden versteld. In vrijwel alle gevallen valt het verstellen van de boortafel te prefereren. Door de boortafel te zwenken en te verdraaien is een groot aantal posities van het werkstuk in geborgde positie bereikbaar.


  • Het verdient de hoogste aanbeveling om het werkstuk te klemmen in een daarvoor bestemde boorklem, of bij grotere werkstukken, met een passende lijmtang. Het komt niet alleen de zuiverheid van het te boren gat ten goede maar bovenal is het veel veiliger. Mocht om welke reden dan ook het werkstuk losraken van de klemming en rond de boor gaan draaien probeer het dan NOOIT (!!) met de hand te stoppen. Druk op de noodschakelaar en doe een stap achteruit.


  • De boorkop heeft conische vatting MC3 met een capaciteit voor boren vanaf 2 tot 16 mm en is zelfklemmend. De boorkop kan eenvoudig gewisseld worden door de draaibare lip tussen boorkop en boorkolom te verdraaien. Daarna kunnen spiraalboren met een MC3 conus direct in de boormachine worden geplaatst. Ook kan een tapkop of grote vezinkboor (beide niet aanwezig) direct op de MC3 conus worden aangesloten.


  • Gebruik van de kolomboor is uitsluitend toegestaan na een korte algemene instructie!


Operating the machine

Safetysheet relay Abene

The machine has a safety relay (on the pillar behind the machine). This stops the machines from starting unattended.

To power on the machine:

  1. Ensure that the black on-off switch on the machine (on the leftside of the head) is in the vertical -middle- off position.
  2. ensure that the key switch on the safety relay is in the "I" position.
  3. Press the green 'on' button on the safety relay.
  1. Use the black on-off switch on the machine to switch it in eithwer the "I" or "II" postion.
  2. The machine will start drilling..

To power off the machine:

  1. Ensure that the black on-off switches on the machine is in the vertical -middle- off position.
  2. Press the red 'off' button on the safety relay.

To put the machine into `out of order' mode.

  1. Ensure that the black on-off switches on the machine is in the vertical -middle- off position.
  2. Press the red 'off' button on the wall control box.
  3. Set the key switch on the safety relay in the "0" position and remove the key.
  4. If you are very concerned about someone re-enabling it - then hand the key to one of the trustees or put it in the mailbox of a trusteed (the one where you sent the [liability waiver] to).
  5. Put a note on the machine stating that it is "Out of Order" with your name and date on it.
  6. Report the issue to the mailing list.


Drilling Speed Table

Depending on material, hole diameter and thickness of the matterial there is an advised drilling speed. A table will be mounted on the pillar behinmd the machine.


Nog te doen

  • achterwand maken en plaatsen
  • werktafel en kolomboor 10 cm. naar links verplaatsen


  • toevoer spanningskabel verlengen en afbeugelen
  • EenChore aanmaken in het CRM-systeem voor onderhoud

Onderhoud

1 maal per kwartaal:

  • Optische inspectie machine.
  • Controle of de machine nog waterpas staat.
  • Eventueel smeren als nodig.


Electrics

Schematic Abene


The emergency stop is wired into the safety relay.

The machine has a N (blue) feed which is not used.


Safety Relay

Schematic safety switch Abene

The safety relay is a box containing a normal start/stop safety relay. It is flanked by a power/current limiter which is set to a fairly conservative value.