Vlakslijpmachine / Surface Grinder: verschil tussen versies
(DirkWillem heeft pagina Vlakslijpmachine / Surface Grinder hernoemd naar Vlakslijpmachine / Surface Grinder - onderhoud/maintenance informatie) (Label: Nieuwe doorverwijzing) |
(Doorverwijzing naar Vlakslijpmachine / Surface Grinder - onderhoud/maintenance informatie verwijderd) (Label: Doorverwijzing verwijderd) |
||
| Regel 1: | Regel 1: | ||
| − | + | [[Category:Tool]][[Category:Metal]][[Category:SafetySheet]] | |
| + | ]{{NoiseCat2}}{{SafetyCat3}} | ||
| + | |||
| + | [[Bestand:Jung-f40.jpg|miniatuur|De machine]] | ||
| + | [[Bestand:Jung-specs.png|miniatuur|Specs]] | ||
| + | |||
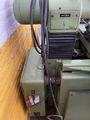
| + | A late '50s, early 60's era surface grinder made by Jung. Het is mogelijk een "F40", "Serie mummer 1049" uit 1957. | ||
| + | |||
| + | For maintenance - see [[Vlakslijpmachine / Surface Grinder - onderhoud/maintenance informatie|this page]]. | ||
| + | |||
| + | '''Belangrijk bij gebruik: | ||
| + | ''' | ||
| + | |||
| + | # Autofeed naar voren werkt niet goed. | ||
| + | # Handeltje loshalen X as is lam (moet nieuw veertje in). | ||
| + | # Niet helemaal zeker of het spindel goed doorgesmeerd is | ||
| + | # Niet helemaal zeker of de leibaanoliepomp werkt. | ||
| + | |||
| + | Tentative classificatie | ||
| + | * geluid: op de grens van alle uren en 7-19. | ||
| + | * safety: verplichte instructie; net op de grens van of waiver nodig is & of node nodig is. Misschien compromis met en zonder auto-feed. Lang en volledig geruisloos uitdraaien van de schijf wel 'eng'. Idem voor schijfwissel. | ||
| + | * misschien apart protocol voor slijpen bijtels/messen - en dat op lager Nivea van instructie. | ||
| + | |||
| + | == Main Controls == | ||
| + | |||
| + | [[Bestand:Jung-controls.png|600px|Main Controls]] | ||
| + | |||
| + | === Instructions - normal use === | ||
| + | |||
| + | Manual movement | ||
| + | |||
| + | * Make sure you have ample clearance | ||
| + | * Moving X direction: | ||
| + | ** Flick the Y stop/end-direction handle to release/disconnect the hydraulic pressure | ||
| + | ** Push the level on the rightmost wheel outward; and push the whole wheel forward to engage. | ||
| + | ** You can now move the table in the X direction | ||
| + | * Moving Y direction | ||
| + | ** Ensure that the small lever behind the Y wheel is in the middle setting. | ||
| + | ** Make sure that the small knob on top of the Y wheel is in the loose connection. | ||
| + | ** You can now use the wheel to move the table in the Y direction. If it is very stiff - check if the Y-fine adjustment dial works. If so - the small knob on top of the Y wheel is in the wrong position. | ||
| + | * Moving Z direction | ||
| + | ** Rotate counterclockwise to lower, clockwise to raise | ||
| + | |||
| + | Automatic movement. | ||
| + | |||
| + | * Make sure you have ample clearance | ||
| + | * Put the speed handle all the way down | ||
| + | * Flick the Y direction handle to release/disconnect the hydraulic pressure | ||
| + | * Engage the hydraulics (requires the magchuck to be on). | ||
| + | * Press the round button to activate the valves. | ||
| + | * Use the speed handle and rotate it gently up | ||
| + | |||
| + | Stop it by flicking the Y direction handle. | ||
| + | |||
| + | The X range is set by pressing the buttons on top of the sliders down - and moving them. | ||
| + | |||
| + | The Y set is set behind the round door - by rotating the knob inside. | ||
| + | |||
| + | The Y range is set with the stoppers at the right side of the machine; below the table. These trigger the Y direction handle. | ||
| + | |||
| + | === Interlocks === | ||
| + | |||
| + | De hydrauliek kan niet aan als de magneet niet aan staat. Ook al is de magneet niet in gebruik. | ||
| + | |||
| + | |||
| + | |||
| + | <gallery> | ||
| + | jung-1.jpg|Valkslijpmachine | ||
| + | jung-2.jpg| Valkslijpmachine | ||
| + | jung-3.jpg| Valkslijpmachine | ||
| + | jung-4.jpg| Valkslijpmachine | ||
| + | jung-5.jpg| Valkslijpmachine | ||
| + | jung-6.jpg| Valkslijpmachine | ||
| + | </gallery> | ||
| + | |||
| + | Temporary page to hold the data on a possible surface grinder. | ||
| + | |||
| + | Model - most likely a Jung F40 or a variation thereof. | ||
| + | |||
| + | === klep bediening === | ||
| + | |||
| + | Vermoedelijk is de leren/ronde knop de activatie van de flow; en het handle rechts ernaast; getriggered door de eindstanden van de Y tafel - is een soort 'stop' release. | ||
| + | |||
| + | Het handeltje links is het debiet - dus de snelheid. | ||
| + | |||
| + | |||
| + | == Spindle en Slijpsteen == | ||
| + | |||
| + | Slijpsteen: | ||
| + | * Gat: 51mm | ||
| + | * Maximale diameter: 200mm (bij 3000rpm -> 200x3.16/3000/60=35meter/seconde) | ||
| + | * Maximale breedte: 16mm volgens folder (maar huidige is 20mm) | ||
| + | |||
| + | Sleuteltje om de het spindle vast te houden is 30mm ID, 4x een 5.5mm pinnen en 9mm diep/lang. De moer is goed stil te zetten met de [[Toolmakers Clamp]] - voor de nut is een tijdelijk tootlje. | ||
| + | |||
| + | [[Bestand:Jung-slijpsteen-1.jpg|320px|spindle]] | ||
| + | [[Bestand:Jung-slijpsteen-2.jpg|320px|voor]] | ||
| + | [[Bestand:Jung-slijpsteen-3.jpg|320px|achter]] | ||
| + | |||
| + | Afmetingen slijpsteen: 200x20x51 (specialist https://www.schleifscheibe-boetzow.de die wat meer heeft dan Eriks en andere generalisten.) | ||
| + | |||
| + | De moer; voorop; heeft een linkse draad (net als de dekplaat van de steen); dus met de klok mee (in de draairichting van de steen) losdraaien. Dit gaat het best als je de steen tegenhoud met de dekplaat middels een [[Toolmakers Clamp]] - of de as tegenhoud (achterop de machine, sleuteltje ?? op de vierkante as die uitsteekt in het huis van de motor -- hiervoor kan ook een doornsleutel van 10x10 ?? gebruikt worden). | ||
| + | |||
| + | [[Bestand:Jung-arbor-5.jpg|320px|moer]] | ||
| + | [[Bestand:Jung-arbor-4.jpg|320px|moer - er half uitgedraaid]] | ||
| + | |||
| + | Als de moer eruit is kan je de binnendraad met special hulpstukje gebruiken: | ||
| + | |||
| + | [[Bestand:Jung-arbor-3.jpg|320px|binnendraad]] | ||
| + | |||
| + | Om de taper los te trekken | ||
| + | [[Bestand:Jung-arbor-1.jpg|320px|taper - female]] | ||
| + | [[Bestand:Jung-arbor-2.jpg|320px|taper - male]] | ||
| + | |||
| + | En extra wielen zijn te koop bij http://veltmanmachines.nl/en/vm/various-accessories/flenzen-voor-jung-slijpbank/. | ||
| + | |||
| + | == Safety == | ||
| + | |||
| + | * Document risico krachten/barsten wiel | ||
| + | |||
| + | * Document safe-side/kickback | ||
| + | |||
| + | * Document carbite/mask/etc risks. | ||
| + | |||
| + | * Document alu en andere no-go/specials materials (te zacht staal) | ||
| + | |||
| + | * Document dressing en aan de opgaande kant houden van de dresser onder hoek weg van 90 graden. | ||
| + | |||
| + | * Document imapact koeling & wiel opstart / koeling uit voordat je het wiel stopt. | ||
| + | |||
| + | == Waarschuwingen == | ||
| + | * Gevaar voor wegvliegende delen | ||
| + | * Gevaar voor draaiende delen | ||
| + | * Gevaar voor letsel aan de handen | ||
| + | * Gevaar carbide | ||
| + | * Pull-in (omgekeerde kickback - werkstuk klem tussen tafel en wiel als je het rechts van het midden zet). | ||
| + | |||
| + | == Voorzieningen == | ||
| + | * Veiligheidsbril | ||
| + | * Veilige kleiding | ||
| + | * Spoeling | ||
| + | * Kappen | ||
| + | * Noodstop | ||
| + | |||
| + | == Maatregelen == | ||
| + | * Locatie noodstop onderdeel instructie | ||
| + | * Veiligheidsbril | ||
| + | * Veilige kleiding, haarnet | ||
| + | * Gebruik stofmaster en spoeling bij carbinde, onderdeel instructie | ||
| + | * Werken aan/vanaf de 'opgaande' kant - zodat het voorwerp zich niet tussen tafel en wiel kan trekken | ||
| + | * Instructie wachten op stoppen wiel | ||
| + | * Stappenplan voor in gebruik nemen nieuwe slijpsteen | ||
| + | * Instructies/uitleg wat de doen bij beschadigd wiel. | ||
| + | |||
| + | == Koeling == | ||
| + | |||
| + | Zie [[SnijOlie_BoorOlie_CuttingOil#Snijolie_voor_Slijpen]] voor gebruikte olie. | ||
| + | |||
| + | === Koeling, Filter en pomp === | ||
| + | |||
| + | == Situatie == | ||
| + | |||
| + | |||
| + | == Locatie == | ||
| + | |||
| + | In de Metaalwerkplaats. | ||
| + | |||
| + | == Angle for dressing == | ||
| + | |||
| + | [[Bestand:Jung-angle-dressing.png|600px|Slight offset for dressing with single point]] | ||
| + | |||
| + | Bron: https://www.nortonabrasives.com/sga-common/files/document/Catalog%20-%20Norton%20Abrasive%20Product%20Solutions%20for%20the%20Full%20Line%20Stock%20Industrial%20Market%20-%207362%20-%202017%20SADiamond.pdf | ||
| + | |||
| + | Zie ook [[Diamond dresser / Ritser]]. | ||
| + | |||
| + | === Experimental dresser thingy === | ||
| + | |||
| + | [[Bestand:Jung-angle-dressing-thing.jpg|200px|Experimental dresser thingy]] | ||
| + | [[Bestand:Jung-angle-dressing-thing-2.jpg|200px|Experimental dresser thingy]] | ||
| + | |||
| + | Can be placed in 4 positions and will easily click of the magchuck if things go wrong. | ||
Versie van 6 feb 2021 om 18:00
]
This equipment is Noise Category 2:
Can be used at all hours, but in moderation.
Be considerate; if you feel you need to wear ear protection,
then only use the tool between 07:00 and 19:00.
This equipment is safety category 3:
- Mandatory, in person, instructions.
- Make sure you read the Wiki before asking.


A late '50s, early 60's era surface grinder made by Jung. Het is mogelijk een "F40", "Serie mummer 1049" uit 1957.
For maintenance - see this page.
Belangrijk bij gebruik:
- Autofeed naar voren werkt niet goed.
- Handeltje loshalen X as is lam (moet nieuw veertje in).
- Niet helemaal zeker of het spindel goed doorgesmeerd is
- Niet helemaal zeker of de leibaanoliepomp werkt.
Tentative classificatie
- geluid: op de grens van alle uren en 7-19.
- safety: verplichte instructie; net op de grens van of waiver nodig is & of node nodig is. Misschien compromis met en zonder auto-feed. Lang en volledig geruisloos uitdraaien van de schijf wel 'eng'. Idem voor schijfwissel.
- misschien apart protocol voor slijpen bijtels/messen - en dat op lager Nivea van instructie.
Inhoud
Main Controls

Instructions - normal use
Manual movement
- Make sure you have ample clearance
- Moving X direction:
- Flick the Y stop/end-direction handle to release/disconnect the hydraulic pressure
- Push the level on the rightmost wheel outward; and push the whole wheel forward to engage.
- You can now move the table in the X direction
- Moving Y direction
- Ensure that the small lever behind the Y wheel is in the middle setting.
- Make sure that the small knob on top of the Y wheel is in the loose connection.
- You can now use the wheel to move the table in the Y direction. If it is very stiff - check if the Y-fine adjustment dial works. If so - the small knob on top of the Y wheel is in the wrong position.
- Moving Z direction
- Rotate counterclockwise to lower, clockwise to raise
Automatic movement.
- Make sure you have ample clearance
- Put the speed handle all the way down
- Flick the Y direction handle to release/disconnect the hydraulic pressure
- Engage the hydraulics (requires the magchuck to be on).
- Press the round button to activate the valves.
- Use the speed handle and rotate it gently up
Stop it by flicking the Y direction handle.
The X range is set by pressing the buttons on top of the sliders down - and moving them.
The Y set is set behind the round door - by rotating the knob inside.
The Y range is set with the stoppers at the right side of the machine; below the table. These trigger the Y direction handle.
Interlocks
De hydrauliek kan niet aan als de magneet niet aan staat. Ook al is de magneet niet in gebruik.
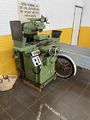
Valkslijpmachine
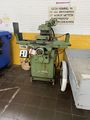
Valkslijpmachine
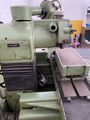
Valkslijpmachine
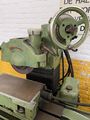
Valkslijpmachine
Valkslijpmachine
Valkslijpmachine


Temporary page to hold the data on a possible surface grinder.
Model - most likely a Jung F40 or a variation thereof.
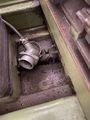
klep bediening
Vermoedelijk is de leren/ronde knop de activatie van de flow; en het handle rechts ernaast; getriggered door de eindstanden van de Y tafel - is een soort 'stop' release.
Het handeltje links is het debiet - dus de snelheid.
Spindle en Slijpsteen
Slijpsteen:
- Gat: 51mm
- Maximale diameter: 200mm (bij 3000rpm -> 200x3.16/3000/60=35meter/seconde)
- Maximale breedte: 16mm volgens folder (maar huidige is 20mm)
Sleuteltje om de het spindle vast te houden is 30mm ID, 4x een 5.5mm pinnen en 9mm diep/lang. De moer is goed stil te zetten met de Toolmakers Clamp - voor de nut is een tijdelijk tootlje.


Afmetingen slijpsteen: 200x20x51 (specialist https://www.schleifscheibe-boetzow.de die wat meer heeft dan Eriks en andere generalisten.)
De moer; voorop; heeft een linkse draad (net als de dekplaat van de steen); dus met de klok mee (in de draairichting van de steen) losdraaien. Dit gaat het best als je de steen tegenhoud met de dekplaat middels een Toolmakers Clamp - of de as tegenhoud (achterop de machine, sleuteltje ?? op de vierkante as die uitsteekt in het huis van de motor -- hiervoor kan ook een doornsleutel van 10x10 ?? gebruikt worden).


Als de moer eruit is kan je de binnendraad met special hulpstukje gebruiken:

Om de taper los te trekken


En extra wielen zijn te koop bij http://veltmanmachines.nl/en/vm/various-accessories/flenzen-voor-jung-slijpbank/.
Safety
- Document risico krachten/barsten wiel
- Document safe-side/kickback
- Document carbite/mask/etc risks.
- Document alu en andere no-go/specials materials (te zacht staal)
- Document dressing en aan de opgaande kant houden van de dresser onder hoek weg van 90 graden.
- Document imapact koeling & wiel opstart / koeling uit voordat je het wiel stopt.
Waarschuwingen
- Gevaar voor wegvliegende delen
- Gevaar voor draaiende delen
- Gevaar voor letsel aan de handen
- Gevaar carbide
- Pull-in (omgekeerde kickback - werkstuk klem tussen tafel en wiel als je het rechts van het midden zet).
Voorzieningen
- Veiligheidsbril
- Veilige kleiding
- Spoeling
- Kappen
- Noodstop
Maatregelen
- Locatie noodstop onderdeel instructie
- Veiligheidsbril
- Veilige kleiding, haarnet
- Gebruik stofmaster en spoeling bij carbinde, onderdeel instructie
- Werken aan/vanaf de 'opgaande' kant - zodat het voorwerp zich niet tussen tafel en wiel kan trekken
- Instructie wachten op stoppen wiel
- Stappenplan voor in gebruik nemen nieuwe slijpsteen
- Instructies/uitleg wat de doen bij beschadigd wiel.
Koeling
Zie SnijOlie_BoorOlie_CuttingOil#Snijolie_voor_Slijpen voor gebruikte olie.
Koeling, Filter en pomp
Situatie
Locatie
In de Metaalwerkplaats.
Angle for dressing

Zie ook Diamond dresser / Ritser.
Experimental dresser thingy


Can be placed in 4 positions and will easily click of the magchuck if things go wrong.