CNC Router Large / CNC portaalfrees
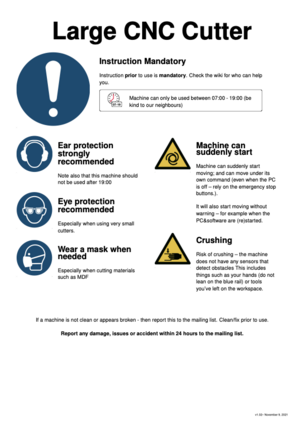
This equipment is Noise Category 2:
- Can be used at all hours, but in moderation.
- Be considerate; if you feel you need to wear ear protection, then only use the tool between 07:00 and 19:00.
This equipment is safety category 3:
- Mandatory, in person, instructions.
- Make sure you read the Wiki before asking.
See: the page Project Grote CNC Freestafel Midlife Update for the latest status of the Upgrade Project.
Grote CNC Snijder / Portaal Frees / XPert2600
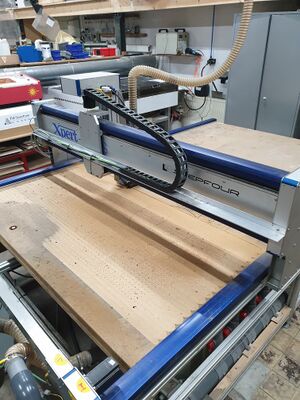
Vooraan in de space staat een grote CNC portaalfrees. Deze is groot genoeg voor full-size houtplaten van meer dan 122 bij 244 centimeter. Normaal gesproken zit er een KRESS-freesmachine in het portaal - geschikt voor hout, plexiglas en licht metaal. We hebben ook een aantal graveerkoppen en Hugo's bovenfrees heeft een ander type KRESS-frees die iets geschikter is voor dun/zacht hout.
Het document [[1]] geeft een goede introductie.
Regels gebruik
Meld schade, storingen of andere zaken zo snel mogelijk, maar zeker binnen 24 uur op de mailinglist.
Verplichte instructie
Instructie is verplicht, kan ad hoc gegeven worden en kost ongeveer 60 minuten. Meld je op de mailinglijst.
Voor de training is geen eigen freesje nodig. Je hebt voor gebruik wel eigen freesjes nodig - mensen schaffen die vaak gezamenlijk aan - dus heeft het zin om op de mailing lijst even te vragen of iemand nog wat heeft liggen. Overigens is een 6mm 'vingerfreesje' (rechte 1 of twee snijder) van hartwijk/gamma/karwij/praxis ook heel geschikt om het eens te proberen. Schachtdikte 6mm, lengte rond de 30-50mm, 1 of 2 messen.
Veiligheid
De machine is geclassificeerd als een normaal apparaat. Er is geen [waiver] nodig - ze kan na instructie normaal gebruikt worden. De bewegende delen zijn echter zwaar en kunnen plotseling snel bewegen. Daarnaast gebruikt het apparaat perslucht en is het vermogen van de spindel relatief groot: 0,56 kW.
- Zorg dat je instructie gehad hebt.
- Zorg dat je weet waar de noodstoppen zitten.
- Gebruik van een veiligheidsbril wordt dringend aanbevolen. Met name als je met dunne freesjes werkt, of tijdens het frezen toekijkt. Ze spatten erg makkelijk stuk.
- Het is verstandig om geluidsbescherming te gebruiken; zeker als je de afzuiging gebruikt en/of de frees op stand 2 of hoger staat.
- Gebruik mondkapjes bij het zagen van materialen als MDF, pertinax, phenoliet of trespa.
- Let op oververhitting - bij te lage snelheden is het niet moeilijk om hout in de fik te krijgen.
- Vraag bij twijfel om hulp!
Een speciaal aandachtspunt zijn slippende freesjes. Als de frees gaat slippen en te ver uit de spantang (collet) zakt, dan wordt ze snel roodgloeiend en dan witheet. In dat geval smelt meestal het freesje (de collet kan meer hebben). Druk dan op de noodknop, zodat de machine stopt. ([2])
Als dit gebeurt, meld het dan op de mailinglist, en meld welke maat collet erin zat. Zo voorkom je dat de volgende gebruiker een dure plaat verknalt omdat de passing niet perfect meer is.
De machine kent drie voornaamste veiligheidspunten:
- Bewegingen van de assen: Zorg dat er niets in de weg staat, zoals bijvoorbeeld het trapje met je Macbook (!)
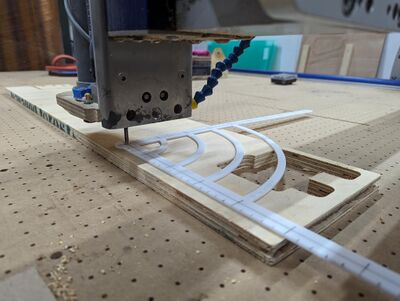
- Breken van frezen: Dit kan op ieder moment gebeuren, maar het voornaamste risico lijkt het te vroeg loskomen van uitgefreesde onderdelen samen met het gebruik van dunne frezen. Het onderdeel komt dan voor de frees die opeens de volle diepte in één keer probeert te frezen, wat in het algemeen niet kan en je onderdeel flink beschadigd. Stel om dit te voorkomen de freesdiepte en de diepte van de laatste rondgang met aandacht in, bijvoorbeeld door het gebruik van "tabs" in je bestand.
- Brand: Door wrijving van een botte frees of te trage bewegingen bij te veel toeren. Bij smeulen lijkt een noodstop gevolgd door blussen met een natte dweil de gepaste oplossing (nog geen ervaring echter).
Inhoud
[verbergen]Introduction
Making something on the CNC has the following steps:
- Design something in your favorite CAD program, and generate an appropiate GCODE file to mill it. Note where your zero reference point is. Save the file to USB stick.
- Turn on the CNC and home it to the machine coordinates.
- Fix your stock material to the table using vacuum or bolts.
- Put an end mill into the spindle that corresponds with the end mill your gcode expects.
- Jog the end mill to the zero position on your material and set the work coordinates for that position to zero. Raise the spindle to a safe height.
- Load your GCODE file and run it.
You can load multiple operations as separate files. The work coordinates will stay until you turn the motors off. This makes it possible to load another end mill between operations.
Detailed steps
1. Start the CNC
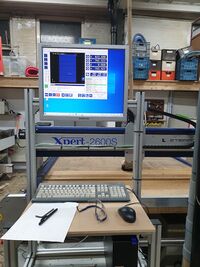
- turn on the computer - the system will logon automatically into Windows using a standard account
- turn on the CNC controller by turning the big switch on the control box.
- start CNC.exe (icon on the home screen), set to full screen
2. Home the machine
- Select the tab 'Operate'
- F2 -> home menu
- F8 -> Home ALL - this will home the Z, Y and X/A axis and lets the software know the machine coordinate limits
- return
- Note: sometimes if an axis is too close to its home position (particularly the Y axis), the software goes into an endless homing state. To fix this: turn of the machine, move the axis manually away from home position and restart from the beginning.
3. Mount an end mill
- Mechanics:
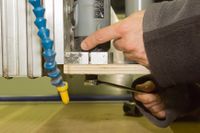
- You can take the Kress spindle out of the holder to access the collet, or leave it and use the push-button and wrench to unscrew the collet
- Use wrench 17 marked with yellow tape (and optionally 15) to unscrew the nut and collet
- Use the correct collet size for your mill. Be careful with imperial sizes (1/4' = 6.35 mm does not fit a 6 mm collet). We have 3.175, 4, 5, 6, 8 and 10mm collets.
- tighten the the collet using the wrench and remount the spindle if you took it off
- make sure the switch on the Kress is in the "on" position and the power cord is connected
- In software:
- Check under the tools tab that all tools have their lengths set to 0.0. This is to make sure that the software does not unexpectedly compensate Z-height if the GCODE file specifies another tool number than the one currently loaded.
- return
4. Zero your work coordinates:
- You can use the jig for locating the desired zero point on your workpiece (shown here on the right, tool info page)
- F9 -> jog
- search the zero point in your object
- (use arrow keys and PgDn/PgUp for z-axis, use shift to move faster)
- set the work coordinates to (0,0,0)
- search the zero point in your object
5. Load and start your GCODE program
- F4 -> auto
- F2 load your .cnc file from USB
- start AUX (vacuum)
- Click Start button -> "please load tool #"
- Check that this tool has length 0.0!
- Click Start again -> your program will now start
Software
Freecad
Probably the best open source option for making things with the CNC is Freecad. It provides the Path Workbench that is used to generate GCODE files that can drive the CNC.
TODO: research this further and provide instructions.
Blender
TODO: find out how to CNC from Blender designs using one of two available plugins
OpenSCAD
It seems OpenSCAD does not have good support for CNC manufacturing. It can export STL files, which can be imported in PyCAM, but it seems this is software chain is problematic and not well-maintained.
Fusion 360
Fusion 360 is proprietary software that needs a (commercial) license. There is a free license available for personal hobby use (see their website, search for private use). It is your responsibility to ensure that you have the required licenses; the Stichting does not condone the use of illegal software. This free version has several limitations, and you'll probably get screwed sometime in the future, but for now this seems good software for makers. Fusion 360 supports powerful 2D and 3D milling operations, such as adaptive clearing. It also supports post-processing for Eding CNC by default.
Manufacture:
- After going from "Model" to "Manufacture" mode, you can create a Manufacturing Model (Setup drop-down menu). Here you can layout your parts on your stock (plywood), without it affecting the position of parts in your model.
- Once created, right-click it -> Edit Manufacturing model. Here use "Align" (Modify drop-down menu) to place all your parts flat "inside" your stock
- Once done, create a new (or edit existing) Setup
Setup edit window:
Setup tab:
- At the top of "Setup" tab in Setup edit window, click on "Machine Select..." and select Postprocessor Eding.cnc from Machine Library / Fusion 360 library. Eding is the dialect of Gcode that our cnc controller speaks
- Our CNC has a range of 1600 mm for X, 2600 mm for Y and 140 mm for Z
- A Kress spindle can do between 10.000 and 27.000 rpm (fixed, it is set manually)
- Coolant "Mist" will blow air from the compressor. "Flood" will turn on the led crosshair. "Aux" will turn on the vacuum, I have not found a way in Fusion to start that automatically so vacuum needs to be started manually.
- WCS: Using a "stock origin point" at the bottom corner of your stock material often works best, but you can use any point that works for you. Table origin is where computer is, so best to put your stock origin point there as well. Then "Z" axis points up, "X" - along the short side of the table, Y - along the long side away from the PC (use Flip axis if necessary).
- Please use a waste board when fully milling to the bottom of your material so you do not mill into the table!
- Model: select what you will be cutting
Stock tab:
- If you have drawn your stock (plywood) as a part/body in your design, select "From solid". Otherwise you can define your stock as "Fixed size box" (regular plywood 1220x2440)
Post Process tab:
- Give your file a descriptive name in "Program Name"
- Machine WCS stays default (Standard; 54)
Now to define cutting paths, select "2D contour" in the 2D drop-down at top.
2D Contour:
Tool tab:
- Click "Select" to choose/define your cutter in the "Select Tool" window that opens. In General, give it a descript name. In Cutter, define your cutter. Shaft remains empty. Choose any Holder for your cutter to make simulations more visible (later). In the "Cutting data" tab choose Spindle speed and Curring feedrate according to considerations mentioned above (plywood works with spindle 10000rpm, feedrate 3000 mm/min). "Post processor" number shall be "3", and so the Length and Diameter offsets.
- Coolant in our case is Mist (compressed air)
- Feed&Speed values are copied here from the "Select Tool" window, no need to alter
Geometry tab:
- Select the contour lines at the top of the contours you wish to cut
- Tabs are needed so your pieces don't come loose (and destroy the cutter). Use rectangular tabs with few mm height and width (for plywood 5mm seems to work). Tab distance of 100 mm is ok, positioning by distance and along Contour.
Heights tab:
Post Process tab:
- Give your file a descriptive name in "Program Name"
- Machine WCS stays default (Standard; 54)
Operations:
- The free version does not allow tool changes in a single program, however you can do multiple operations with the same tool. Generate operations for each tool as a separate file and try to order your operations to avoid changing tool back and forth.
- Post Process -> generate the .cnc GCODE file
- Select "Clearance Height", it saves unneccessary moves over the "G28" setting
- Save the .cnc file to USB stick
- This file can be loaded in the Eding CNC software, see above
Inhoud
[verbergen]Freesjes en loopsnelheid
De machine is geoptimaliseerd voor het frezen van dun aluminium. Dit betekent dat ze niet ideaal is voor hout. Daarom is het van belang om zorgvuldig om te gaan met de instellingen, want je hebt niet veel vrijheid.
Het 'mesje' van een normaal/simpel freesje moet met een snelheid van ongeveer 100 meter/minuut langs het hout gaan (en rond de 200 voor hardhout). Gaat het te snel, dan wordt het snel bot (en bij dit type frees is dat een kwestie van een paar minuten). Het freesje draait rond en heeft een omtrek van pi x diameter. Delen van de gewenste snelheid door deze omtrek geeft je het aantal omwentelingen per minuut.
Dus als het freesje een diameter heeft van 6mm (en dus een omtrek van pi x 6 = 20mm) dan moet het dus 100.000/20 = 5000 rotaties per minuut maken. Dit is instelling '1' op de frees (het boekje met de tabel zit in de bovenste lade).
Bij elke slag in het rond 'eet' een freesje wat hout weg. Per mes is dit meestal tussen de 0.10mm en 0.20mm (of 0.05mm voor een mooie fijne afwerking). Heb je een snijder met twee messen dan 'eet' je per omwenteling twee maal zo veel; bij 4 messen 4x zoveel et cetera.
Dat betekent dat je bij 5000rpm x 0.10mm = ongeveer 500 mm per minuut 'eet' met een eenmessig freesje, of 1000mm/minuut met een normale 2-snijder.
Dit wordt het uitgangspunt voor de 'feed rate'. In de praktijk doe je soms iets minder of kan je sneller gaan, met name als je het zaagsel goed kwijt kunt.
Over het algemeen kan je meer spelen met de feed rate dan met de RPMs. Het verkeerd hebben (met name te hoog) van de RPMs is al snel het eind van het freesje.
Veel van dit soort sommetjes komen uit op waarden die 'niet kunnen' - dus waarbij de frees (veel) langzamer dan 5000RPM moet draaien (wat de Kress niet kan), of waarbij de arm sneller moet gaan dan 8meter/minuut (wat de tafel niet kan). Dit betekent in de praktijk dat er een vrij nauwe band is van mogelijke waardes.
In de praktijk betekent het dat we vooral simpele één- en tweesnijders gebruiken.
Compressiefreesjes of up/down freesjes werken goed in zacht hout en MDF:
Het is in het begin erg makkelijk om een freesje stuk te krijgen (verbranden of breken) - dus goedkoop is geen slecht idee. Als je een instelling goed hebt, is het de moeite waard om naar kwaliteitsfrezen over te stappen. Als je de tijd hebt is Aliexpress vaak een stuk voordeliger, vooral voor de betere carbide freesjes. Freesjes van hardmetaal/carbide gaan langer mee maar zijn meer breekbaar dan HSS freesjes. Een carbide freesje met 6 mm diameter is een goed compromis tussen prijs, breekbaarheid en standtijd voor onze frees. Deze kosten tussen 6 en 9 euro p/st op Aliexpress, 20 euro of meer bij lokale leveranciers.
Freesjes met een lengte van 50 tot 90 mm zijn goed. Langer is niet handig, want het z-bereik is ongeveer 140 mm dus als het model 70 mm hoog is dan kan een frees tot 70 mm (onder de spindle) er net overheen bewegen, een langere frees kan dat niet meer.
Spantang/Collets
De KRESS-frezen gebruiken geen standaard C(2) conische collets; maar hebben een eigen systeem (OR). Gebruik van een euro-collet ruïneert de kop van de frees subiet.
We hebben op dit moment 3.125, 4, 5, 6, 8 en 10mm houders. Nieuwe/extra zijn te bestellen bij DamenCNC voor de simpele types en [CNC-plus.de] voor de complexe types. De prijzen varieren enorm; rond de 20 euro is normaal.
BELANGRIJK
Nut stuck
To do - proper description of using two spanners.
Collect stuck
Als het goed is komt het collet mee met de moer. Soms blijft deze echter achter in de kop - met name als je plakkerig materiaal (zoals MDF of hout met veel hars) gesneden hebt.
Je kunt het collet dan het best verwijderen door een sleuteltje 10 tussen de kop en de rand van het collet te steken; en die voorzichtig haaks op de as te drukken. De schuine rand van het collet helpt dan met het los-schieten.
Als dat niet lukt - zet dan vooral niet veel kracht. Kop en lagers zijn relatief kwestbaar en draaien wel 25.000 keer per minuut rond. De combinatie betekent een grote middelpuntvliegende kracht bij kleine asymmetrie. Zelfs de kleinste verbuiging of afwijking betekent een trilling die zichzelf verergert.
Koppel in dat geval frees los, haal hem uit de houder en doe de rest van het lospeuteren op de werkbank. Ondersteun hierbij de kop van de frees goed met een blokje hout; en zorg dat er geen `buig' krachten op frees of kop komen.
De voedingsstekker kan losgekoppeld worden door de zwarte palletjes links en rechts in te drukken. De frees kan vertikaal omhoog uit de eurohouder geschoven worden nadat de inbusbout linksonder aan de voorkant is losgemaakt.
Indien je denkt dat de kop of het collet beschadigd is: meld het op de mailinglijst. Zo voorkom je dat iemand anders zijn (dure) plaat of frees nodeloos kapot maakt.
Diepte per keer
Normaal is een diepte van 1/5 tot 1/3 van de diameter van een frees per gang. Dus bij een 6 mm freesje doe je per gang rond de 1.5-2 mm. Dit soort dieptes zeker aanhouden als je materiaal niet goed weg kan - dus bij een diepe sleuf, plakkerig hout/stof.
Als je veel materiaal moet verwijderen is het beter om een "adaptive clearing" strategie te gebruiken. Daarmee ga je dieper en gebruik je niet de volle breedte van de frees, maar snijd je met de zijkant. Zo gebruik je een groter deel van het snijvlak en bereik je een meer constante belasting. Met adaptive clearing kan je met een 6 mm frees 4-6 mm diep gaan en 2.4 mm zijdelings wegnemen.
Snelheid
Bij zachter materiaal werkt de frees goed met een snelheid rond 3000 mm/min. Dat lijkt vrij snel, maar het voorkomt dat de frees of het materiaal warm wordt.
Als je een vorm los wil snijden (bv met een contour operatie) moet je op twee dingen letten:
- Zorg dat je materiaal op een wasteboard wordt opgespannen, zodat je laatste snede niet in de tafel gaat (ook niet een beetje).
- Gebruik "tabs" om te voorkomen dat je vorm te vroeg loslaat, waardoor je frees kan breken.
Vacufix
As of March 2018 we have a vacuum blower that can help hold things down on the table.
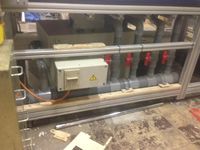
The controlbox is left of the 4 valves (under the table; right of the control pedestal).
Switch it on with the green button on front; off with the red one.
There is a pink filter just before the elbow going off to the machine. It can be slid out with its 110mm ring after pulling the 50mm tube 'up'.
De slangen zijn Afzuig slang PU-Flex
Vacuum areas / valves
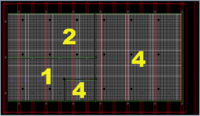
There are 4 zones; a small zone to the right of the control unit( within the right-bottom quarter ; the right-bottom quarter; the left bottom quarter and the far side half of table. The sizes match the largest 'GAMMA' standard plywood sheets (the CNC machine has a slightly larger operating area).
Try to use the smallest zone possible for the best suction; and cover the rest of the zone as needed.
The numbers on the table correspond to the valves; from left to right. There is a small drawing under each valve as well.
Original machine
Our large CNC machine was originally built as an XPertMill 2600 by the company Step-Four. This company does not exist anymore, and we could not reinstall the proprietary XPertMill software after a computer crash. Therefore we decided to update the electronics and software.
Mid-life update
Our CNC controller is now based on the Eding CNC 720 4-Axis controller. The controller is fed by a 24V power supply. We also replaced the steppers, drivers and cables. We use closed-loop steppers and drivers from Stepper Online, which are relabeled 2 Nm Nema 23 Leadshine CL57 closed loop steppers. These are powered by the original 48V power supply.
Outputs on the controller are connected using relais to the Vacufix for dust collection and vacuum table (AUX), compressor (MIST) and led light (FLOOD). There are Emergency stops on every corner of the table. Take care not to press those inadvertently during your work!
Also Known As
CNC Router Table, Engraving, CNC-frees, CNC portaal frees, Portaalfreesmachine, freesmachine, CNC houtfrees, Graveermachine, Graveer machine, Graveren.
History
| Date | Description |
|---|---|
| August 2024 | Solved issue: DC PSU was slow switching on, sometimes not at all. PSU replaced (Alex) |
| July 2024 | Discovered issue: Sometimes axes do not move. Random occurence with unknown cause. |
| ?May-june 2024? | ?Someone? updated to EdingCNC 5.0 beta8 |
| April 2019 | Rewiring of head, connetors, air hose connectors added, removal old cabling. |
| May 2019 | New lasers mounted. |
| June 2019 | Spanner 17 was missing; replaced. |
| Oct 2019 | Second Kress has died (locking mechanism). Replaced. |
| Oct 2021 | Mid-life update to new electronics and Eding controller |
