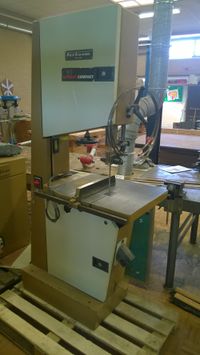
Lintzaag Centauro 500 CO

From MakerSpace Leiden
Jump to: navigation, search
Safety Sheet bandsaw
Lintzaag.jpg

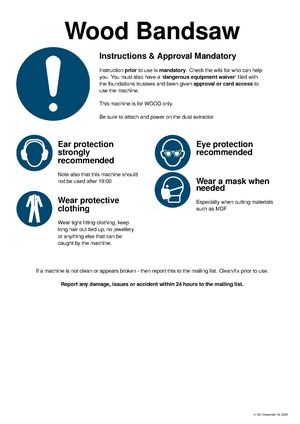
This equipment is safety category 2:

  • Mandatory instructions.
  • [liability waiver] on file.
  • Approval from trustees, but ok to operate alone
(but be careful/ensure you have assistance when handling very large things).

This equipment is Noise Category 2:
Can be used at all hours, but in moderation.
Be considerate; if you feel you need to wear ear protection,
then only use the tool between 07:00 and 19:00.

Documentation: .pdf or .doc. Original document not yet found.

Algemeen

De lintzaag is een *hout* zaag; voor zacht en (niet te hard) hout - dat zich goed laat verspanen (als de zaag heet wordt dan verspaand het materiaal waarschijnlijk niet goed genoeg).

De lint zaag is (waarschijnlijk) een Centauro CO 500. Hij werkt op krachtstroom (rond de 2 kWatt/3 Pk); en is geschikt tot diktes van rond de 45cm. Er zijn in verleden waarschijnlijk een aantal extra elektrische veiligheidvoorzieningen aan toegevoegd.

Afhankelijk van hoe breed het zaagblad is - kan men 'figuur zagen'. De kleinste draai radius is rond de 4 cm voor het dunste blad (10mm breed); 8 cm voor het 12mm blad en loopt op tot 25cm voor het breedste blad. Dit is vrij 'breed'. Dus zelfs met het smalste 1cm blad kan men nauwelijks de curve van een koffie mok halen.

De zaag is niet geschikt voor 'afkorten'; met name omdat er dan een groot risico is van zaagbreuk. Nieuwe zaagbladen kosten tussen de 150 en 250 euro.

Zorg er vooral voor dat het werkstuk goed ondersteund wordt - het zaagblad is, net als bij een figuurzaagde, relatief slecht bestand tegen enig kantelen of afknijpen. Gebruik dus voor rechte snedes en afkorten de afkortzaag en de cirkelzaagtafel.

Opstelling

Voor de machine (waar je staat) moet ongeveer 1.50m vrij zijn; links en achter de machine een meter. Naast de machine (dus aan de kant van de schakelaar) 20-30cm (zodat het deurtje goed open kan..

Als men groot plaatmateriaal zaagt, is het handig om de rolbok op te stellen.

Basis regels

Gebruik de blauwe stofzuiger in de Houtwerkplaats. Deze past precies!

Opmerking vooraf: Het veilig gebruiken van een zaagtafel leer je niet door het lezen van de wiki en de handleidingen; maar door goede praktijkinstructie en oefening op de machine. Vraag dus om hulp en instructie wanneer nodig.


  1. De gebruiker heeft de verplichte instructie gevolgd; en gebruikt zijn eigen 'tag' om het apparaat aan te zetten.
  2. Gebruik van geluidsbescherming, bril en veilige kleding verplicht. Werkschoenen aanbevolen. Denk bij krachtstroom apparatuur goed na over het gebruik van handschoenen; de schade is vaak groter als het zaagblad de handschoen grijpt.
  3. Alleen voor gebruik met hout en soortgelijke toegestane materialen.
  4. De machine dient schoon achter gelaten te worden; met de RFID toegangs controle op 'uit'.
  5. De machine nooit in 'energized' staat achterlaten/alleen laten.

- Als je twijfelt - gebruik de machine niet - en de-activeer deze indien nodig.

Verplichte meldingen:

  1. De gebruiker *moet* melding maken van mankementen, storingen of zaken zoals het eraflopen/breken van de zaag.
  2. Gebruik de noodstop alleen voor noodgevallen - en meld gebruik.
  3. Meld doorslaan zekeringen (bijvoorbeeld bij te snel naar 3 fase/driehoek schakelen) altijd.
  4. Ongelukken en bijna ongelukken moeten gemeld worden (alles waar meer voor nodig is dan een simpele pleister).

Voor gebruik (bij twijfel - gebruik de procedure en checklist uit de handleiding):

  1. Controleer of de machine schoon is; en niets defect lijkt.
  2. Zorg dat de omgeving rond de machine schoon is; de vloer niet glad - en vrij is van obstakels (je moet behoorlijk 'rond' de zaag lopen).
  3. Zorg dat mensen die direct in de buurt zijn weten dat je gaat zagen - zodat niemand zich achter je langs wringt.
  4. Check het werkstuk op nietjes, spijkers, scheren en andere zaken die je tijdens het zagen gaan opbreken. Dit type zaag is kwetsbaarder dan de andere zagen die we hebben. Wij zouden deze metaal-detector hiervoor kunnen aanschaffen
  5. Check dat de zaag mooi over de geleiders boven en onder de tafel loopt.
  6. Check dat er geen speling zit tussen geleiders en blad - en dat het blad 'strak' staat.
  7. Blijf goed luisteren: let er op dat het een regelmatig geluid is, zonder rare piepen.

Tijdens gebruik (bij twijfel - gebruik de procedure en checklist uit de handleiding):

  1. Altijd de bescherming aan de bovenkant zo dicht mogelijk bij het werkstuk. Nooit meer dan 2cm tussen werkstuk en rail. Bij gebruik van de geleide rail en een aandruk houtje werkstuk altijd volledig in contact houden met de tafel en niet meer dan 5mm (liefst minder) tussen geleide rail en bovenkant werkstuk (wat dus relatief plat moet zijn voor dit type zaag).
  2. Blijf goed luisteren: als de zaag raar (piepend) geluid gaat maken, is er iets aan de hand!
  3. Laat de zaag het werk doen: niet te hard duwen.

Na gebruik

Wat betreft de machine schoon en veilig achterlaten - per algemene makerspace regel is dit altijd de verantwoordelijkheid van de *laatste* gebruiker. Dus als je de troep van een ander niet wil opruimen; meld het dan - en gebruik de machine niet. Zodra je iets gebruikt ben je verantwoordelijk voor het in goede en schone staat achterlaten van de machine; en het melden van storingen of defecten.

Check dat de zak van de stofzuiger niet vol is - indien wel - leeg deze dan.

(optional) Apply some Silbergleit (dry lubricant) to the cast iron table to lubricate and protect it.

Gevaren

  1. Niet te hard duwen
  2. Niet te klein materiaal gebruiken

Vertanding / teeth-per-inch

Voor zachte materialen, zoals multiplex of normaal hout, wil je minmaal tussen de 3 en 6 tanden over je hele zaagdikte (zeker bij dunner materiaal). Bij harde materialen; zoals hardhout is dit liever wat meer. En hoe groener het hout - hoe minder tanden per dikte/afstand je idealiter wil.

De straal van de bocht die je kunt halen is minimaal 3; maar eerder 5-6 maal de breedte van de bandzaag (en dat is nog wat optimistisch).

Instructie

De instructie duurt meestal tussen de 10 en 20 minuten en wordt op verzoek, 1 op 1, gegeven.

Mensen die instructie kunnen geven: zie mijn.makerspaceleiden.nl.

Problemen en defecten melden bij: deelnemers@makerspaceleiden.nl

Ongelukken melden bij: bestuur@makerspaceleiden.nl

Instellen

https://www.thewoodwhisperer.com/videos/best-way-set-bandsaw/


If the blade is tracking, i.e. not cutting straight, it is become dull. Sharpening the blade (~30 min with a dremel) eliminates tracking and allows straight cuts of 0.5mm veneer on this band saw

NB: Max/min. blade length for this saw is 3945/3860 mm (from here)

Gebruik pas
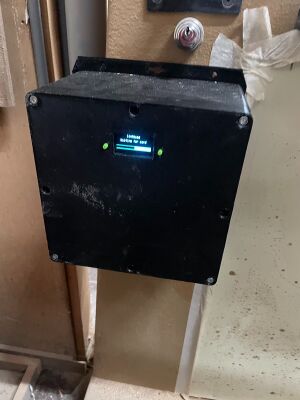
Bandzaagnode.jpeg

The bandsaw has its own Node Bandsaw;

to start

  1. Make sure the turn button on the front is in the '11 O'Clock' position (off).
  2. Hold you badge agains it - and the red light should come on solid (it will flash shortly as it checks your card). You should hear a relay clock.
  3. Once the light is on - press the green button on the safety relay at the back (you will hear a loud click.
    1. You need to press this green button flowly; firmly and in the middle. Pressing it hurriedly will not close the contacts proper enough.
  4. You can now use the machine.

to stop

  1. Press the red button on the big safety relay on the back.

Then clean the machine.

Wiring

The bandsaw is a three phase machine. It is wired directly into the mains. Use the big 'krachtstroom' main switch in the corner near the door to switch off all power.

The power goes to a Safety Relay. The relays 'interlock' is wired through an access control node, current-limiter and through the control-switch on the front. It may also be wired through an overheating 'clickson' in the motor.

This means that, in order to power it on, the control box needs to give it the OK -and- the rotary control switch at the front needs to be in the off position.

FAQ

Het lampje brandt niet, is hij wel aangesloten?

  • Lampje doet het niet. Zegt niets over wel of niet aangesloten zijn.
  • Het zou fijn zijn als dat opgelost wordt.

Ik hoor niets als ik mijn tag voor het kastje houd

  • Misschien is hij vastgelopen. Even stekker 6 op het patchpaneel loshalen en na 3 seconden weer terugpluggen.
  • Het zou fijn zijn als hij niet meer vastloopt. Ook zou het fijn zijn als er een resetknopje op het apparaat komt.

Ik hoor een klik in het kastje als ik mijn tag er voor houd, maar toch doet hij het niet

  • Schakelaar aan de andere kant van de zaag vergeten in te drukken?
  • Het zou fijn zijn als de schakelaar bij het kastje komt te zitten.

Ik druk de schakelaar aan de achterkant in, maar die wil niet actief worden.

  • Misschien staat de schakelaar aan de voorkant nog aan? Die moet uit zijn om de schakelaar aan de achterkant te laten werken.

Events

Datum notitie
2018-10-8 Nieuwe zaag
2018-11-23 Nieuwe zaag
2019-12-26 Sharpened the saw blade (freehand, dremel and ~20 min of patience). Makes a huge difference - the saw is cutting straight now, even re-saw (>50mm thickness)!!! Unfortunately, this holds only until the first nail/screw/staple. Sharpened the blade two more times. Would love to share this "knowhow" - feel free to ask (AlexY)
2020-02-23 New dust extraction adapter printed and installed. Also installed shields for more efficient dust collection directly under the table. The table cannot be tilted now, and should remain in the current orientation: 90 degrees to the saw.}
2022-11-13 Connected to central dust extraction

Repair (AlexY) 26-12-2019

  • welded a finger-friendly nut on the bolt holding the acrylic saw guard
  • installed a custom-made "M12.5" set screw into the turning handle of the blade guide raiser
  • Made pulley trekker (stored on the faux roof above the CV ketel) for removing the wheels
  • removed the bottom wheel
  • removed the brake mechanism (unscrew the pedal first)
  • replaced the (broken) split pin on which the lip of the brake pad rests
  • sanded the polymer lining of the top wheel, removed ~0.5mm of excentricity (saw blade is running more in line now)
  • Remove the top wheel to access the blade guide raiser mechanism
  • Replaced a missing pin, needed to keep the clutch cylinder in place while turning the wheel. Had to extend the pin using two pins and a piece of aluminium tube
  • Re-installed, re-aligned, should be running ok
  • <img src="/mediawiki/images/thumb/d/d4/Lintzaag_zonder_onderste_wiel.jpg/120px-Lintzaag_zonder_onderste_wiel.jpg" srcset="/mediawiki/images/thumb/d/d4/Lintzaag_zonder_onderste_wiel.jpg/180px-Lintzaag_zonder_onderste_wiel.jpg 1.5x, /mediawiki/images/thumb/d/d4/Lintzaag_zonder_onderste_wiel.jpg/240px-Lintzaag_zonder_onderste_wiel.jpg 2x" alt="" width="120" height="68" /> Bottom wheel removed
  • <img src="/mediawiki/images/thumb/8/86/Onderste_wiel_lintzaag.jpg/67px-Onderste_wiel_lintzaag.jpg" srcset="/mediawiki/images/thumb/8/86/Onderste_wiel_lintzaag.jpg/101px-Onderste_wiel_lintzaag.jpg 1.5x, /mediawiki/images/thumb/8/86/Onderste_wiel_lintzaag.jpg/135px-Onderste_wiel_lintzaag.jpg 2x" alt="" width="67" height="120" /> Bottom wheel
  • <img src="/mediawiki/images/thumb/5/5d/Remmechanisme.jpg/120px-Remmechanisme.jpg" srcset="/mediawiki/images/thumb/5/5d/Remmechanisme.jpg/180px-Remmechanisme.jpg 1.5x, /mediawiki/images/thumb/5/5d/Remmechanisme.jpg/240px-Remmechanisme.jpg 2x" alt="" width="120" height="63" /> Brake mechanism
  • <img src="/mediawiki/images/thumb/5/59/Remmechanism_pin.jpg/120px-Remmechanism_pin.jpg" srcset="/mediawiki/images/thumb/5/59/Remmechanism_pin.jpg/180px-Remmechanism_pin.jpg 1.5x, /mediawiki/images/thumb/5/59/Remmechanism_pin.jpg/240px-Remmechanism_pin.jpg 2x" alt="" width="120" height="68" /> Break mechanism with pin installed
  • <img src="/mediawiki/images/thumb/f/fb/Versleten_remblok.jpg/120px-Versleten_remblok.jpg" srcset="/mediawiki/images/thumb/f/fb/Versleten_remblok.jpg/180px-Versleten_remblok.jpg 1.5x, /mediawiki/images/thumb/f/fb/Versleten_remblok.jpg/240px-Versleten_remblok.jpg 2x" alt="" width="120" height="68" /> Worn brake pad
  • <img src="/mediawiki/images/thumb/6/6d/Lintzaag_remtrommel_radius.jpg/120px-Lintzaag_remtrommel_radius.jpg" srcset="/mediawiki/images/thumb/6/6d/Lintzaag_remtrommel_radius.jpg/180px-Lintzaag_remtrommel_radius.jpg 1.5x, /mediawiki/images/thumb/6/6d/Lintzaag_remtrommel_radius.jpg/240px-Lintzaag_remtrommel_radius.jpg 2x" alt="" width="120" height="68" /> Brake drum radius
  • <img src="/mediawiki/images/thumb/2/24/Saw_guard_clutch_before.jpg/67px-Saw_guard_clutch_before.jpg" srcset="/mediawiki/images/thumb/2/24/Saw_guard_clutch_before.jpg/101px-Saw_guard_clutch_before.jpg 1.5x, /mediawiki/images/thumb/2/24/Saw_guard_clutch_before.jpg/135px-Saw_guard_clutch_before.jpg 2x" alt="" width="67" height="120" /> Saw guard clutch mechanism before repair
  • <img src="/mediawiki/images/thumb/d/d5/Saw_guard_clutch_after.jpg/67px-Saw_guard_clutch_after.jpg" srcset="/mediawiki/images/thumb/d/d5/Saw_guard_clutch_after.jpg/101px-Saw_guard_clutch_after.jpg 1.5x, /mediawiki/images/thumb/d/d5/Saw_guard_clutch_after.jpg/135px-Saw_guard_clutch_after.jpg 2x" alt="" width="67" height="120" /> Saw guard clutch mechanism repaired


Improvement AlexY 23-02-2020


  • Added two metal and two wooden shields at the bottom where the saw blade exits the table.
  • Removed the worn-off brake for eventual repair/replacement of the brake pad: BRAKING PEDAL IS NOT USABLE NOW!
  • <img src="/mediawiki/images/thumb/2/29/Band_saw_belt_tensioning_screws.jpg/120px-Band_saw_belt_tensioning_screws.jpg" srcset="/mediawiki/images/thumb/2/29/Band_saw_belt_tensioning_screws.jpg/180px-Band_saw_belt_tensioning_screws.jpg 1.5x, /mediawiki/images/thumb/2/29/Band_saw_belt_tensioning_screws.jpg/240px-Band_saw_belt_tensioning_screws.jpg 2x" alt="" width="120" height="68" /> Loosen these two screws supporting the motor to reduce tension on the belt before removing the lower wheel
  • <img src="/mediawiki/images/thumb/d/d8/Band_saw_temporary_screw.jpg/116px-Band_saw_temporary_screw.jpg" srcset="/mediawiki/images/thumb/d/d8/Band_saw_temporary_screw.jpg/174px-Band_saw_temporary_screw.jpg 1.5x, /mediawiki/images/thumb/d/d8/Band_saw_temporary_screw.jpg/231px-Band_saw_temporary_screw.jpg 2x" alt="" width="116" height="120" /> Temporary M12 screw installed to hold the brake pedal down - BRAKE IS NOT USABLE! (Please do not loose the thin washer between the saw wall and the brake lever)
  • <img src="/mediawiki/images/thumb/5/5a/Band_saw_brake_with_bolt.jpg/120px-Band_saw_brake_with_bolt.jpg" srcset="/mediawiki/images/thumb/5/5a/Band_saw_brake_with_bolt.jpg/180px-Band_saw_brake_with_bolt.jpg 1.5x, /mediawiki/images/thumb/5/5a/Band_saw_brake_with_bolt.jpg/240px-Band_saw_brake_with_bolt.jpg 2x" alt="" width="120" height="81" /> Worn off brake pad removed from the band saw. Please do not loose the bolt!
  • <img src="/mediawiki/images/thumb/1/15/Band_saw_bottom_wheel_removed.jpg/77px-Band_saw_bottom_wheel_removed.jpg" srcset="/mediawiki/images/thumb/1/15/Band_saw_bottom_wheel_removed.jpg/116px-Band_saw_bottom_wheel_removed.jpg 1.5x, /mediawiki/images/thumb/1/15/Band_saw_bottom_wheel_removed.jpg/155px-Band_saw_bottom_wheel_removed.jpg 2x" alt="" width="77" height="120" /> Band saw with the bottom wheel and the brake removed


Improvement Nov 2022 with AlexY with RonaldR:

  • Installed the 50mm OD dust extraction line to the succubus
  • Added angled dust extraction adapter (printed in two pieces to avoid overhang/supports, glued together with 5-min epoxy)

Lintzaagblad

Zaaglint lassen: https://www.youtube.com/watch?v=J5ZwjZ0_de8