Jointer / Vlakbank: verschil tussen versies
| (51 tussenliggende versies door 4 gebruikers niet weergegeven) | |||
| Regel 1: | Regel 1: | ||
| − | [[Category: | + | [[Category:Tools]][[Category:Wood working tools]][[Category:SafetySheet]] |
| + | {{SafetyCat1}} | ||
| + | {{NoiseCat1}} | ||
| + | {{DustControl1}} | ||
| + | |||
[[Bestand:Vlakbank.jpg|300px|thumb|left]] | [[Bestand:Vlakbank.jpg|300px|thumb|left]] | ||
| + | [[Bestand:SafetyVlakbank.png|300px|thumb|right]] | ||
| + | |||
| + | =Intro= | ||
| + | Dit is met stip het meest gevaarlijke apparaat van de space. | ||
| + | |||
| + | Sluit altijd de [[DeWalt Wood Chip Extractor / Grote afzuiger| Grote DeWalt afzuiger]] altijd - want anders kan het hout zich onderop ophopen en gaan smeulen. Dat hebben we al eens geprobeerd - en was niet fijn. | ||
| + | |||
| + | ==Access control== | ||
| + | [[Bestand:VlakbankOutside.jpeg|miniatuur]] | ||
| + | |||
| + | This node is under [[Node Vlakbank]] control. Swipe your badge; then press the green button on the [[Safety Relay]] to turn it on. | ||
| + | |||
| + | Press the red button on the safety contactor to turn it off. | ||
| + | |||
| + | ==Na gebruik== | ||
| + | |||
| + | # Machine goed schoonmaken; ook van binnen. | ||
| + | # Check dat de zak van de [[DeWalt Wood Chip Extractor / Grote afzuiger| Grote Stofafzuiger]] niet meer dan half vol is - indien wel - leeg deze dan (zie [[DeWalt Wood Chip Extractor / Grote afzuiger|instructies]]). | ||
| + | # (Optional) Apply some [[Silbergleit (dry lubricant)]] to protect and lubricate the cast iron tables and the fence. | ||
| + | |||
| + | =Messen= | ||
| + | De messen zijn relatief kwetsbaar. Zorg er dus voor dat je absoluut '''geen hout hebt met spijkers''' of andere zaken. Dan komen er happen/bramen in. Dit kan ook gebeuren bij normaal gebruik. | ||
| + | |||
| + | Meld het onmiddelijk als je ziet dat er een hapje uit is - zodat de volgende persoon zijn hout niet ruinieerd. | ||
| + | |||
| + | Er zijn 5 Messen van 300 x 3mm x 26mm (reeds 6_ maal geslepen) en twee sets nieuwe messen. De 2 sets van 3 nieuwe messen waren 300x35x3 bij aankoop (2018-11). | ||
| + | {| class="wikitable" | ||
| + | |- | ||
| + | ! Set | ||
| + | ! Geslepen | ||
| + | ! Geschiedenis | ||
| + | |- | ||
| + | | 1 | ||
| + | | 6 maal geslepen | ||
| + | | 5 messen; medio 2017 en 2018 geslepen | ||
| + | |- | ||
| + | | 2 | ||
| + | | 3stuks, nieuw 2018/10 | ||
| + | | Nog niet in gebruik | ||
| + | |- | ||
| + | | 3 | ||
| + | | 3stuks, nieuw 2018/10 | ||
| + | | Nog niet in gebruik | ||
| + | |} | ||
| + | |||
| + | Standaard SCHAAFMESSEN HSS VOOR 300X35X3 zijn rond de 20 euro/stuk. Slijpen kost rond de 7 euro per mes bij [[https://www.slijperijvlijm.nl/ Slijperij Vlijm]] op de Flevoweg (achter de Gamma). | ||
| − | + | We kunnen het ook zelf dankzij een [[Schaafmes Slijphouder|jig van HansD]]. | |
| − | + | ==Wat te doen als ik een mes kapot maak== | |
| + | Dat is niet erg - en kan bij normaal gebruik gebeuren. Meld het in elk geval meteen op de deelnemerslijst. Zodat de volgende persoon zijn hout niet ruinieerd. | ||
| − | + | Als het komt doordat je een spijker geraakt hebt, of als je een veelgebruiker bent, of met erg hard hout werkt - dan mag je schuldgevoel natuurlijk afkopen door de messen te laten slijpen, door nieuwe te doneren of door 15-25 euro in de pot te stoppen. Of slijp ze met behulp van de [[Schaafmes Slijphouder]] en de [[Surface Grinder / Vlakslijpmachine]]. | |
| + | |||
| + | =Safety= | ||
| + | The safety of the jointer can be improved by using two different devices: | ||
| + | * the built-in blade guard; | ||
| + | * push blocks. | ||
| + | '''Blade guard''' | ||
| + | |||
| + | The purpose of the blade guard is to keep your fingers away from the cutter. The blade guard is mounted on springs, make sure that '''the guard fully covers the blade in its resting resting state'''. When taking a pass, you should never move the guard by hand, it is designed to be moved aside by the piece of wood itself. It is intended to be used in the following way, depending on what your are jointing: | ||
| + | * When jointing the '''face''' of a board (making a face flat): the board should be pushed under the blade guard, by going under the curved bit. Your leading hand will then follow the board by gliding over the blade guard and apply pressure on the outfeed table. | ||
| + | * When jointing the '''edge''' of a board (making an edge straight), push your piece against the fence and let the guard move by itself. Be very careful with the hand pushing the back of the piece, as it will go over the unprotected cutter | ||
| + | Proper operation of the jointer can be seen in [https://www.youtube.com/watch?v=QAjPElePAog this video]. | ||
| + | |||
| + | '''Push blocks''' | ||
| + | |||
| + | Push blocks act as another layer between your hands and the blades and increase the distance between your hands and the blades. Use them whenever possible, especially when squaring stock. When jointing sheets, use one block to push the sheet against the fence. Push blocks should never touch the blades, only the stock. | ||
| + | [[Bestand:Jointer-push-blocks.jpg|right|middle|thumb|Jointer push blocks]] | ||
| + | ==Kick-back== | ||
| + | You can reduce chances of kick-back (when your stock has knots, for instance) by taking lighter passes. Change the depth of the cut using the lever on the right side of the machine. Also, always cut downhill with regards to the grain of the wood. | ||
| + | |||
| + | The harder the wood, the higher the chances of kickback. | ||
| + | |||
| + | '''Kick-back can happen even when taking all necessary precautions''', be as careful as you can, but be aware things can and will go wrong. The best way to not get hurt is to not use it if you don't need it. | ||
| + | |||
| + | ==General rules== | ||
| + | Lighter passes help reducing wear on the blades and will give you a better surface. | ||
| + | |||
| + | Make sure you have enough space to process your stock, both on the in-feed side and out-feed side of the machine, and that your way is fully cleared. | ||
| + | |||
| + | A good thing to do is to rehearse the cut you are about to make before turning the machine on: | ||
| + | * where are your hands and feet located? | ||
| + | * how do you hold the stock? | ||
| + | * are your hands very close to the blades, can you avoid it? | ||
| + | * do you have to bend over the surface? | ||
| + | * what do you do once you have completed your cut? | ||
| + | * do you really need to leave the machine on after your cut and if so, is the blade guard covering the blades? | ||
| + | Your attention decreases greatly when performing the same task over and over. This is when most accidents happen, even for experienced woodworkers. Try to remember that '''every cut is as dangerous as the previous one'''. | ||
| + | |||
| + | '''Process only solid wood free of nails and screws. You can check for the presence of metal parts in your wood piece with the dedicated tool.''' | ||
| + | |||
| + | Man-made materials like plywood are bad for the blades. | ||
| + | |||
| + | Inspect your stock before turning the machine on. Mark the faces you want to process and the direction in which you will process them. Always joint downhill. | ||
| + | |||
| + | You can coat the infeed and out feed tables as well as the fence and the underside of the blade guard with some [[Silbergleit (dry lubricant)]] to facilitate the gliding of the piece of wood (makes quite a difference, especially for bigger pieces). | ||
| − | = History = | + | =History= |
{| class="wikitable" | {| class="wikitable" | ||
|- | |- | ||
| − | ! Datum | + | ! Datum |
| + | ! Wie | ||
| + | ! Wat | ||
| + | |- | ||
| + | | 21/10/2018 | ||
| + | | DirkWillem | ||
| + | | Nieuwe messen besteld. | ||
| + | |- | ||
| + | | 28/10/2018 | ||
| + | | DirkWillem | ||
| + | | Nieuwe 300x35x3 messen op space. HansD gaat ze er in zetten. | ||
|- | |- | ||
| − | | | + | | 28/10/2018 |
| + | | DirkWillem | ||
| + | | Alle bestelde 300x35x3 HSS messen aangekomen. | ||
|} | |} | ||
Huidige versie van 11 nov 2024 om 23:41
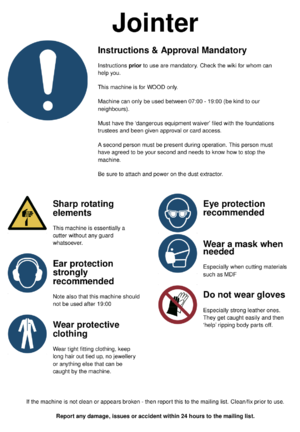
This equipment is safety category 1 - the most dangerous class of machines.
Mandatory instruction is required.
The [liability waiver] needs to be on file and approval from the trustees is required (post instruction).
Two people present at all times.
Can only be used between 07:00 and 19:00 because of noise.
This equipment is Noise Category 1: can only be used between 07:00 and 19:00.
Wear hearing protection.
This equipment MUST be used with active dust control:
- Connect a shop-vac prior to use and keep it on while using it.
- Let it run for 10-20 seconds post use.
Not doing so endangers the operator, others, the space and the equipment.
Regarding the DeWalt Wood Chip Extractor:
- Do not fill the bag past 2/3rd of its capacity.
- Check for enough airflow before using the connected tool.
- Check that there is no (hot/smoldering) wood in the bottom of the machine when you smell something.
Inhoud
Intro
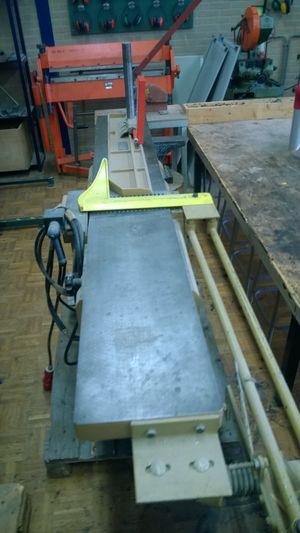
Dit is met stip het meest gevaarlijke apparaat van de space.
Sluit altijd de Grote DeWalt afzuiger altijd - want anders kan het hout zich onderop ophopen en gaan smeulen. Dat hebben we al eens geprobeerd - en was niet fijn.
Access control
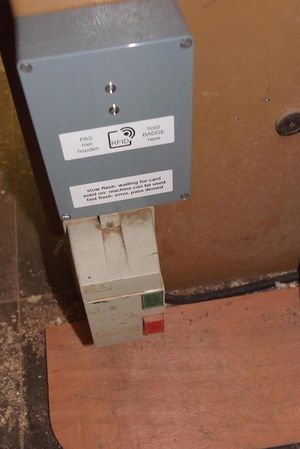
This node is under Node Vlakbank control. Swipe your badge; then press the green button on the Safety Relay to turn it on.
Press the red button on the safety contactor to turn it off.
Na gebruik
- Machine goed schoonmaken; ook van binnen.
- Check dat de zak van de Grote Stofafzuiger niet meer dan half vol is - indien wel - leeg deze dan (zie instructies).
- (Optional) Apply some Silbergleit (dry lubricant) to protect and lubricate the cast iron tables and the fence.
Messen
De messen zijn relatief kwetsbaar. Zorg er dus voor dat je absoluut geen hout hebt met spijkers of andere zaken. Dan komen er happen/bramen in. Dit kan ook gebeuren bij normaal gebruik.
Meld het onmiddelijk als je ziet dat er een hapje uit is - zodat de volgende persoon zijn hout niet ruinieerd.
Er zijn 5 Messen van 300 x 3mm x 26mm (reeds 6_ maal geslepen) en twee sets nieuwe messen. De 2 sets van 3 nieuwe messen waren 300x35x3 bij aankoop (2018-11).
| Set | Geslepen | Geschiedenis |
|---|---|---|
| 1 | 6 maal geslepen | 5 messen; medio 2017 en 2018 geslepen |
| 2 | 3stuks, nieuw 2018/10 | Nog niet in gebruik |
| 3 | 3stuks, nieuw 2018/10 | Nog niet in gebruik |
Standaard SCHAAFMESSEN HSS VOOR 300X35X3 zijn rond de 20 euro/stuk. Slijpen kost rond de 7 euro per mes bij [Slijperij Vlijm] op de Flevoweg (achter de Gamma).
We kunnen het ook zelf dankzij een jig van HansD.
Wat te doen als ik een mes kapot maak
Dat is niet erg - en kan bij normaal gebruik gebeuren. Meld het in elk geval meteen op de deelnemerslijst. Zodat de volgende persoon zijn hout niet ruinieerd.
Als het komt doordat je een spijker geraakt hebt, of als je een veelgebruiker bent, of met erg hard hout werkt - dan mag je schuldgevoel natuurlijk afkopen door de messen te laten slijpen, door nieuwe te doneren of door 15-25 euro in de pot te stoppen. Of slijp ze met behulp van de Schaafmes Slijphouder en de Surface Grinder / Vlakslijpmachine.
Safety
The safety of the jointer can be improved by using two different devices:
- the built-in blade guard;
- push blocks.
Blade guard
The purpose of the blade guard is to keep your fingers away from the cutter. The blade guard is mounted on springs, make sure that the guard fully covers the blade in its resting resting state. When taking a pass, you should never move the guard by hand, it is designed to be moved aside by the piece of wood itself. It is intended to be used in the following way, depending on what your are jointing:
- When jointing the face of a board (making a face flat): the board should be pushed under the blade guard, by going under the curved bit. Your leading hand will then follow the board by gliding over the blade guard and apply pressure on the outfeed table.
- When jointing the edge of a board (making an edge straight), push your piece against the fence and let the guard move by itself. Be very careful with the hand pushing the back of the piece, as it will go over the unprotected cutter
Proper operation of the jointer can be seen in this video.
Push blocks
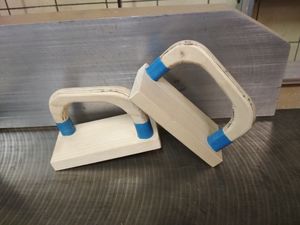
Push blocks act as another layer between your hands and the blades and increase the distance between your hands and the blades. Use them whenever possible, especially when squaring stock. When jointing sheets, use one block to push the sheet against the fence. Push blocks should never touch the blades, only the stock.
Kick-back
You can reduce chances of kick-back (when your stock has knots, for instance) by taking lighter passes. Change the depth of the cut using the lever on the right side of the machine. Also, always cut downhill with regards to the grain of the wood.
The harder the wood, the higher the chances of kickback.
Kick-back can happen even when taking all necessary precautions, be as careful as you can, but be aware things can and will go wrong. The best way to not get hurt is to not use it if you don't need it.
General rules
Lighter passes help reducing wear on the blades and will give you a better surface.
Make sure you have enough space to process your stock, both on the in-feed side and out-feed side of the machine, and that your way is fully cleared.
A good thing to do is to rehearse the cut you are about to make before turning the machine on:
- where are your hands and feet located?
- how do you hold the stock?
- are your hands very close to the blades, can you avoid it?
- do you have to bend over the surface?
- what do you do once you have completed your cut?
- do you really need to leave the machine on after your cut and if so, is the blade guard covering the blades?
Your attention decreases greatly when performing the same task over and over. This is when most accidents happen, even for experienced woodworkers. Try to remember that every cut is as dangerous as the previous one.
Process only solid wood free of nails and screws. You can check for the presence of metal parts in your wood piece with the dedicated tool.
Man-made materials like plywood are bad for the blades.
Inspect your stock before turning the machine on. Mark the faces you want to process and the direction in which you will process them. Always joint downhill.
You can coat the infeed and out feed tables as well as the fence and the underside of the blade guard with some Silbergleit (dry lubricant) to facilitate the gliding of the piece of wood (makes quite a difference, especially for bigger pieces).
History
| Datum | Wie | Wat |
|---|---|---|
| 21/10/2018 | DirkWillem | Nieuwe messen besteld. |
| 28/10/2018 | DirkWillem | Nieuwe 300x35x3 messen op space. HansD gaat ze er in zetten. |
| 28/10/2018 | DirkWillem | Alle bestelde 300x35x3 HSS messen aangekomen. |


